'2022/01'에 해당되는 글 68건
- 2022.01.22 빔 지름
- 2022.01.21 e-paper 보드 발견
- 2022.01.21 nvidia jetson nano 2gb / csi
- 2022.01.21 기부 시즌
- 2022.01.21 rpi csi to dsi...
- 2022.01.21 rpi 7" dsi
- 2022.01.20 rpi DSI 7인치 터치 스크린
- 2022.01.20 retinex 알고리즘
- 2022.01.20 jetson nano gpu 사용 상태 확인
- 2022.01.20 jetson nano 2g dev. kit 셋업
EPD 패널 -------------
GDEP015OC1 / 200x200 / 1.54inch
[링크 : https://www.e-paper-display.com/products_detail/productId%3d305.html]
GDE0213B1 / 250x122 / 2.13 inch
[링크 : https://kp-electronicequipment.en.alibaba.com/product/60687088297-805091538/]
GDE021A1 / 172x72 / 2.04inch
[링크 : https://www.smart-prototyping.com/.../10600471%20e%20ink%20paper%20v2.0/GDE021A1.pdf]
[링크 : https://github.com/ewfuentes/stm32l0/blob/master/app/display/gde021a1.c]
GDE029A1 / 296x128 / 2.9inch
[링크 : https://www.futurashop.it/Allegato_PDF_ENG/4238-EPAPER029A1.pdf]
보드 ----------
GDE021/029
DESTM32-S2 라고 써있는걸 봐서는 GDEP015 는 못쓸것 같긴한데..
[링크 : https://www.e-paper-display.com/download_detail/downloadsId%3d467.html]
[링크 : https://www.e-paper-display.com/products_detail/productId=362.html]
[링크 : https://www.e-paper-display.com/products_list/pmcId%3d25.html]
+
| Position 2.While shorting 3.0Ω resistor and RESE, this board is suitable for the following E-Paper displays: 1.1.54 inch E-Paper Display: GDEP015OC1, GDEH0154D27, GDEM0154E97LT and GDEW0154Z17 2.2.04 inch E-Paper Display: GDE021A1/ILE021A1 3.2.13 inch E-Paper Display: GDE0213B1/GDEH0213B1 and GDEM0213E28LT 4.2.9 inch E-Paper Display: GDE029A1/GDEH029A1, GDEW029Z10 and GDEM029E27LT 5.7.5 inch E-Paper Display: GDEW075T8 and GDEW075Z09 |
[링크 : https://www.e-paper-display.com/products_detail/productId=362.html]
'하드웨어 > Display 장비' 카테고리의 다른 글
| 빔 프로젝터 구매! (0) | 2023.08.14 |
|---|---|
| USB-C to HDMI 컨버터 회로 (0) | 2022.01.24 |
| ddi tcon (0) | 2019.06.24 |
| 강원전자 IC-314-AUD DVI KVM 4:1 스위치 (0) | 2019.01.23 |
| nvidia shield over internet (0) | 2018.05.08 |
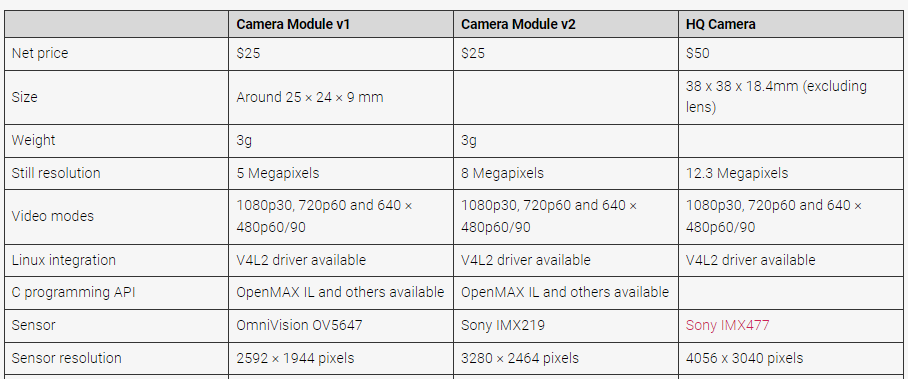
rpi cam v2.1 사용, rpi cam v1.3은 사용불가
| $ nvgstcapture-1.0 Encoder null, cannot set bitrate! Encoder Profile = High Supported resolutions in case of ARGUS Camera (2) : 640x480 (3) : 1280x720 (4) : 1920x1080 (5) : 2104x1560 (6) : 2592x1944 (7) : 2616x1472 (8) : 3840x2160 (9) : 3896x2192 (10): 4208x3120 (11): 5632x3168 (12): 5632x4224 Runtime ARGUS Camera Commands: Help : 'h' Quit : 'q' Set Capture Mode: mo:<val> (1): image (2): video Get Capture Mode: gmo Set sensor orientation: so:<val> (0): none (1): Rotate counter-clockwise 90 degrees (2): Rotate 180 degrees (3): Rotate clockwise 90 degrees Get sensor orientation: gso Set sensor mode: smo:<val> e.g., smo:1 Get sensor mode: gsmo Set Whitebalance Mode: wb:<val> (0): off (1): auto (2): incandescent (3): fluorescent (4): warm-fluorescent (5): daylight (6): cloudy-daylight (7): twilight (8): shade (9): manual Get Whitebalance Mode: gwb Set Saturation (0 to 2): st:<val> e.g., st:1.25 Get Saturation: gst Set Exposure Compensation (-2 to 2): ec:<val> e.g., ec:-2 Get Exposure Compensation: gec Set Auto Whitebalance Lock: awbl:<val> e.g., awbl:0 Get Auto Whitebalance Lock: awbl Set Auto Exposure Lock: ael:<val> e.g., ael:0 Get Auto Exposure Lock: gael Set TNR Mode: tnrm:<val> e.g., tnrm:1 (0): OFF (1): FAST (2): HIGH QUALITY Get TNR Mode: gtnrm Set TNR Strength (-1 to 1): tnrs:<val> e.g., tnrs:0.5 Get TNR Strength: gtnrs Set EE Mode: eem:<val> e.g., eem:1 (0): OFF (1): FAST (2): HIGH QUALITY Get EE Mode: geem Set EE Strength (-1 to 1): ees:<val> e.g., ees:0.5 Get EE Strength: gees Set Auto Exposure Anti-Banding (0 to 3): aeab:<val> e.g., aeab:2 (0): OFF (1): MODE AUTO (2): MODE 50HZ (3): MODE 60HZ Get Auto Exposure Anti-Banding: gaeab Set Gain Range: gr:<val><space><val> e.g., gr:1 16 Get Gain Range: ggr Set Exposure Time Range: etr:<val><space><val> e.g., etr:34000 35000 Get Exposure Time Range: getr Set ISP Digital Gain Range: dgr:<val><space><val> e.g., dgr:2 152 Get ISP Digital Gain Range: gdgr Capture: enter 'j' OR followed by a timer (e.g., jx5000, capture after 5 seconds) OR followed by multishot count (e.g., j:6, capture 6 images) timer/multihot values are optional, capture defaults to single shot with timer=0s Start Recording : enter '1' Stop Recording : enter '0' Video snapshot : enter '2' (While recording video) Get Preview Resolution: gpcr Get Image Capture Resolution: gicr Get Video Capture Resolution: gvcr Runtime encoder configuration options: Set Encoding Bit-rate(in bytes): br:<val> e.g., br:4000000 Get Encoding Bit-rate(in bytes): gbr Set Encoding Profile(only for H.264): ep:<val> e.g., ep:1 (0): Baseline (1): Main (2): High Get Encoding Profile(only for H.264): gep Force IDR Frame on video Encoder(only for H.264): Enter 'f' bitrate = 4000000 Encoder Profile = High Encoder control-rate = 1 Encoder EnableTwopassCBR = 0 Opening in BLOCKING MODE ** Message: 15:18:30.462: <main:4670> iterating capture loop .... NvMMLiteOpen : Block : BlockType = 4 ===== NVMEDIA: NVENC ===== NvMMLiteBlockCreate : Block : BlockType = 4 GST_ARGUS: Creating output stream CONSUMER: Waiting until producer is connected... GST_ARGUS: Available Sensor modes : GST_ARGUS: 3264 x 2464 FR = 21.000000 fps Duration = 47619048 ; Analog Gain range min 1.000000, max 10.625000; Exposure Range min 13000, max 683709000; GST_ARGUS: 3264 x 1848 FR = 28.000001 fps Duration = 35714284 ; Analog Gain range min 1.000000, max 10.625000; Exposure Range min 13000, max 683709000; GST_ARGUS: 1920 x 1080 FR = 29.999999 fps Duration = 33333334 ; Analog Gain range min 1.000000, max 10.625000; Exposure Range min 13000, max 683709000; GST_ARGUS: 1640 x 1232 FR = 29.999999 fps Duration = 33333334 ; Analog Gain range min 1.000000, max 10.625000; Exposure Range min 13000, max 683709000; GST_ARGUS: 1280 x 720 FR = 59.999999 fps Duration = 16666667 ; Analog Gain range min 1.000000, max 10.625000; Exposure Range min 13000, max 683709000; GST_ARGUS: 1280 x 720 FR = 120.000005 fps Duration = 8333333 ; Analog Gain range min 1.000000, max 10.625000; Exposure Range min 13000, max 683709000; GST_ARGUS: Running with following settings: Camera index = 0 Camera mode = 5 Output Stream W = 1280 H = 720 seconds to Run = 0 Frame Rate = 120.000005 GST_ARGUS: Setup Complete, Starting captures for 0 seconds GST_ARGUS: Starting repeat capture requests. CONSUMER: Producer has connected; continuing. ^C** Message: 15:18:32.652: <_intr_handler:4261> User Interrupted.. Terminating the camera pipeline ... GST_ARGUS: Cleaning up CONSUMER: Done Success GST_ARGUS: Done Success ** Message: 15:18:33.098: <main:4680> Capture completed ** Message: 15:18:33.098: <main:4729> Camera application will now exit |
[링크 : https://developer.nvidia.com/embedded/learn/tutorials/first-picture-csi-usb-camera]
카메라 호환성 목록
nano에서 사용가능한 CSI/MIPI로 제한할 경우 아래의 센서 목록이 나오는데, rpicam v1.3의 ov5647은 없다.
imx219가 rpicam v2.1에 채택된 녀석.
| AR0135CS AR0144 AR0145 AR0234 AR0234CS AR0330 AR0521 AR1335 HDPYX 230-G IMX179 IMX183 IMX185 IMX219 IMX226 IMX250 IMX264 IMX265 IMX267 IMX273 IMX274 IMX287 IMX290 IMX296 IMX297 IMX304 IMX327 IMX334 IMX335 IMX377 IMX385 IMX390 IMX392 IMX412 IMX415 IMX462 IMX464 IMX477 IMX485 IMX540 IMX565 IMX577 MT9V024 OV2311 Python 480 RAA462113 |
15핀
| 8 megapixels and supports CSI-2 bus interface |
[링크 : https://kr.rs-online.com/web/p/raspberry-pi-cameras/9132664]
[링크 : https://www.raspberrypi.com/documentation/accessories/camera.html#hardware-specification]
'embeded > jetson' 카테고리의 다른 글
| jetson nano deepstream (0) | 2022.02.10 |
|---|---|
| jetson nano developer board(구형) 부팅 문제 (0) | 2022.02.09 |
| jetson nano gpu 사용 상태 확인 (0) | 2022.01.20 |
| jetson nano 2g dev. kit 셋업 (0) | 2022.01.20 |
| jetson nano 켜보는데.. (0) | 2022.01.19 |
알람이 와서 보니 기부의 시기가 돌아온듯
내돈 안내고 생색내는 기분이라 좋긴한데 소득공제 시즌이라 왜 기부금에 안뜨지? 싶어서 찾아보니

와.. 씨... 직접 결제한 기부금에 한함.. 아놔..
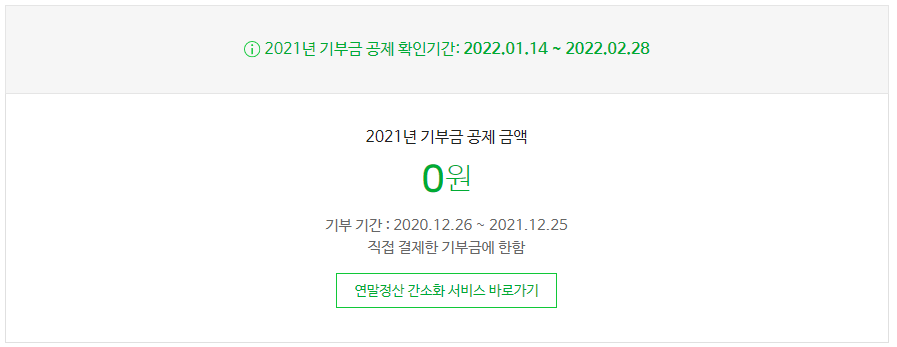
갑자기 해피빈 하는거 짜게 식어버리네?
아무튼 누군가에게 부족하지 않은 한끼가 되길 바라며

'개소리 왈왈 > 블로그' 카테고리의 다른 글
| 잘가 내 위키 (3) | 2022.03.02 |
|---|---|
| 홈페이지 호스팅.. 버릴까 (0) | 2022.02.27 |
| 해피빈 기부 (0) | 2021.09.26 |
| 으아아아 하루 안썼네 (0) | 2021.08.04 |
| 해피빈 기부 룰렛 (0) | 2021.07.14 |
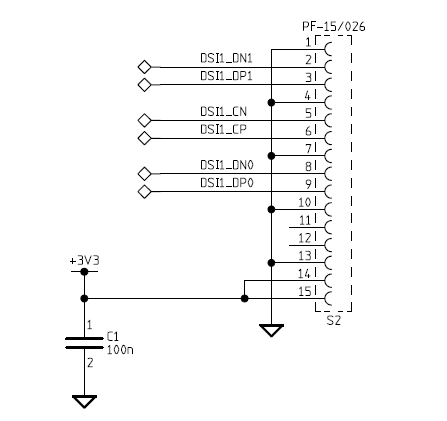
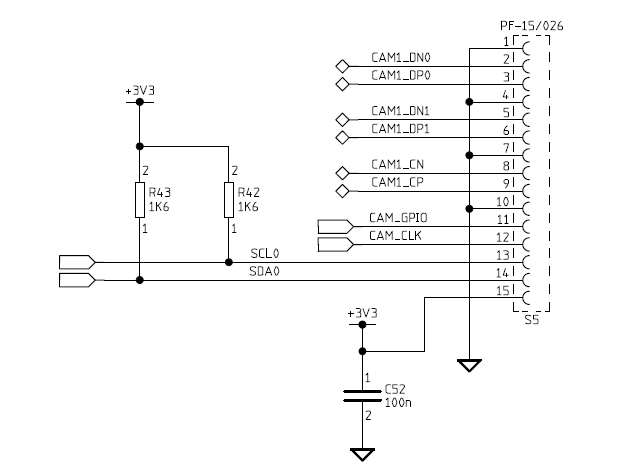
간단하게 말하면.. 두개가 인터페이스 다르니 연결안됨 이라고 하는데..
DSI to LVDS / LVDS to CSI 하면 가능할 것 같다고 이야기 하지만...
그냥 DSI의 데이터 2채널과 컨트롤 포트를 CSI의 2채널과 컨트롤 포트를 연결하면 안되는 건가?
 |
 |
[링크 : https://raspberrypi.stackexchange.com/questions/107117/]
+
[링크 : https://www.mipi.org/specifications/csi-2]
[링크 : https://www.mipi.org/specifications/dsi]
DSI D-PHY
DSI-2 C_PHY
CSI-1 D-PHY
CSI-2 C-PHY
CSI-3 M-PHY
[링크 : https://m.blog.naver.com/prnbada7/221194846455]
[링크 : https://en.wikipedia.org/wiki/Display_Serial_Interface]
'embeded > raspberry pi' 카테고리의 다른 글
| rpi i2c oled (0) | 2022.02.10 |
|---|---|
| 라즈베리 파이 부품 도착 (0) | 2022.02.09 |
| rpi 7" dsi (0) | 2022.01.21 |
| rpi DSI 7인치 터치 스크린 (0) | 2022.01.20 |
| rpitx on rpi4 (0) | 2021.12.22 |
라즈베리 파이 3B+ 에 2021-03-04-raspios-buster-armhf-full.img 을 이용해서 테스트 함.
선은 넉넉하게 주니(4개) 핀번호 3,5번도 같이 연결해준다.(SDA/SCL 서로 연결)
전원만 연결해도 터치 되는데 저~~~언혀 문제 없다. DSI 컨트롤 채널을 통해서 터치 정보가 넘어가나 보네..?

[링크 : https://community.element14.com/.../raspberry-pi-7-touchscreen-display]
buster가 oldstable이 되면서 업데이트 하려면 allow-releaseinfo-change 인지 먼지는 해주어야 하고
정말 아무런 설정없이 바로 터치 + DSI 출력이 된다.
다만 10포인트 멀티터치라는데 라즈베리 기본 lxde 에서 해당 기능을 테스트 할 수 있는진 알 수 없다.
라즈베리 기본 이미지에서 아래와 같이 xrandr 하면 800x480으로 인식하고
| $ xrandr Screen 0: minimum 800 x 480, current 800 x 480, maximum 800 x 480 default connected 800x480+0+0 0mm x 0mm 800x480 0.00* |
공식 7인치 터치 LCD인데 waveshare의 것과 동일하게 sysfs에 생겨서 밝기는 조절이 가능하다.
| $ cd /sys/class/backlight/rpi_backlight/ $ ls -al 합계 0 drwxr-xr-x 3 root root 0 3월 5 2021 . drwxr-xr-x 3 root root 0 3월 5 2021 .. -r--r--r-- 1 root root 4096 1월 21 11:29 actual_brightness -rw-r--r-- 1 root root 4096 1월 21 11:29 bl_power -rw-r--r-- 1 root root 4096 1월 21 11:23 brightness lrwxrwxrwx 1 root root 0 1월 21 11:29 device -> ../../../rpi_backlight -r--r--r-- 1 root root 4096 1월 21 11:29 max_brightness drwxr-xr-x 2 root root 0 1월 21 11:29 power -r--r--r-- 1 root root 4096 1월 21 11:29 scale lrwxrwxrwx 1 root root 0 1월 21 11:29 subsystem -> ../../../../../class/backlight -r--r--r-- 1 root root 4096 1월 21 11:29 type -rw-r--r-- 1 root root 4096 1월 21 11:29 uevent # echo 100 > brightness # echo 255 > brightness |
[링크 : https://www.waveshare.com/wiki/7inch_DSI_LCD]
+
HDMI + LCD 성공한 분이 계시니(마침 rpi3b+) 시도해봄
아래와 같은 구성으로 화면은 잡히는데 터치스크린은 두개를 합친 크기로 인식되어 쓰기에는 좀 미묘...

실행하기 위해서는 xorg.conf에 파일 하나 내용 갈아 엎어야 한다.
| $ sudo service lightdm stop $ sudo startx -- -layout Multihead |
[링크 : https://louie0724.tistory.com/345]
---------------------
이것저것 하다가 기억이 꼬였는데
display_default_lcd=1을 해주면 부팅하고 약 3~5분 정도만 HDMI로 나오다 DSI로도 HDMI로도 화면이 안나온다
완전히 죽는건 아닌지 감으로 터미널 단축키로 열고 종료하면 종료 되는걸 봐서는
hdmi / dsi 출력 설정에 무언가 영향을 줘서 DSI로 강제 설정되며 HDMI가 꺼지는것으로 추측.
| display_default_lcd If a Raspberry Pi DSI LCD is detected it will be used as the default display and will show the framebuffer. Setting display_default_lcd=0 will ensure the LCD is not the default display, which usually implies the HDMI output will be the default. The LCD can still be used by choosing its display number from supported applications, for example, omxplayer. |
[링크 : https://www.raspberrypi.com/documentation/computers/config_txt.html#lcd-displays-and-touchscreens]
+
HDMI + DSI는 쉽진 않은 듯?
[링크 : https://forums.raspberrypi.com/viewtopic.php?t=247696]
[링크 : https://forums.raspberrypi.com/viewtopic.php?t=246384]
'embeded > raspberry pi' 카테고리의 다른 글
| 라즈베리 파이 부품 도착 (0) | 2022.02.09 |
|---|---|
| rpi csi to dsi... (0) | 2022.01.21 |
| rpi DSI 7인치 터치 스크린 (0) | 2022.01.20 |
| rpitx on rpi4 (0) | 2021.12.22 |
| rpitx (0) | 2021.12.16 |
처음으로 만져보는 DSI 디스플레이 (회사 어딘가 짱박혀 있던...)
DSI는 자체적으로 통신을 해서 켤수 있는거라 rpi config.txt를 손대지 않아도
기본으로 작동하는 것으로 보인다(rpi 3b+)
HDMI + DSI로 하려면 먼가 해야 한다는데 내용이 없음.
| The Raspberry Pi Touch Display is an LCD display which connects to the Raspberry Pi through the DSI connector. In some situations, it allows for the use of both the HDMI and LCD displays at the same time (this requires software support). |
DSI를 연결하고 demsg 확인해보니 아래정도의 내용밖에 없다.
| [ 1.958699] bcm2708_fb soc:fb: FB found 1 display(s) [ 1.974466] Console: switching to colour frame buffer device 100x30 [ 1.983719] bcm2708_fb soc:fb: Registered framebuffer for display 0, size 800x480 [ 1.990749] Serial: 8250/16550 driver, 1 ports, IRQ sharing enabled |
그리고 i2c의 sda / scl도 연결해놔서 확인을 해보는데
배선이 문제인지 노이즈를 타서.. 일단 두 개 정도 i2c를 통해 보인다.
| $ i2cdetect -y 1 0 1 2 3 4 5 6 7 8 9 a b c d e f 00: -- -- -- -- -- -- -- -- -- -- -- -- -- 10: -- -- -- -- -- -- -- -- -- -- -- -- -- -- -- -- 20: -- -- -- -- -- -- -- -- -- -- -- -- -- -- -- -- 30: -- -- -- -- -- -- -- -- 38 -- -- -- -- -- -- -- 40: -- -- -- -- -- 45 -- -- -- -- -- -- -- -- -- -- 50: -- -- -- -- -- -- -- -- -- -- -- -- -- -- -- -- 60: -- -- -- -- -- -- -- -- -- -- -- -- -- -- -- -- 70: -- -- -- -- -- -- -- -- |
터치는 USB로 하는줄 알았는데 그건 또 아닌 것 같고(내용상 USB 전원이라고..)
pwm 백라이트 제어와 전원 제어를 i2c를 통해 할 수 있다는걸 보면 하나는 터치 다른 하나는 pwm 제어인 듯.
| PWM backlight control and power control over I2C interface |
[링크 : https://www.raspberrypi.com/documentation/accessories/display.html]
[링크 : https://kr.element14.com/raspberry-pi/raspberrypi-display/raspberry-pi-7inch-touchscreen/dp/2473872]
[링크 : https://www.devicemart.co.kr/goods/view?no=1273487]
0x38이 touch i2c 인 것으로 생각되네.
[링크 : https://www.newhavendisplay.com/app_notes/FT5x06.pdf]
[링크 : https://titanwolf.org/Network/Articles/Article?AID=21afc5b0-03fa-4179-b818-de7e73f36573]
config.txt에 아래를 추가하니
| dtoverlay=rpi-ft5406 |
dmesg 상에서는 아래의 하나가 추가 되는 것 같다.
| [ 7.641514] input: raspberrypi-ts as /devices/platform/soc/soc:firmware/soc:firmware:touchscreen/input/input1 |
'embeded > raspberry pi' 카테고리의 다른 글
| rpi csi to dsi... (0) | 2022.01.21 |
|---|---|
| rpi 7" dsi (0) | 2022.01.21 |
| rpitx on rpi4 (0) | 2021.12.22 |
| rpitx (0) | 2021.12.16 |
| wayland on rpi (0) | 2021.11.22 |
retinex 알고리즘은 어두운 사진에서 식별 가능하도록 보정해주는 거라고 하는데(CCTV 등?)
내용을 보면 그것과는 좀 다른 느낌?
| Retinex improves visual rendering of an image when lighting conditions are not good. While our eye can see colors correctly when light is low, cameras and video cams can't manage this well. The MSRCR (MultiScale Retinex with Color Restoration) algorithm, which is at the root of the Retinex filter, is inspired by the eye biological mechanisms to adapt itself to these conditions. Retinex stands for Retina + cortex. |
[링크 : https://docs.gimp.org/en/plug-in-retinex.html]
| Retinex 알고리즘은 칼라의 일관성과 시각적인 개선을 제공하지만, 전역적인 contrast 감소와 후광효과 및 색왜곡 문제를 발생시 키기도 한다 |
[링크 : https://www.koreascience.or.kr/article/JAKO201307364424092.pdf]
| 입력 영상에 들어있는 배경 성분을 제거하는 것 |
[링크 : https://kipl.tistory.com/65]
'이론 관련 > 2D 그래픽 관련' 카테고리의 다른 글
| jpeg 헤더 (0) | 2020.12.01 |
|---|---|
| 영상처리 관련 링크 기술 (0) | 2017.04.19 |
| HDRi / HDRI (High dynamic range imaging) (0) | 2011.04.29 |
| BDF - Bitmap Distribution Format (0) | 2011.04.28 |
| pbm pgm - Netpbm format (2) | 2010.06.09 |
tegrastats를 실행하면 된다는데 root 권한이 아니면 몇가지 항목이 나오지 않는다.
| $ sudo tegrastats RAM 493/1980MB (lfb 240x4MB) SWAP 0/5086MB (cached 0MB) IRAM 0/252kB(lfb 252kB) CPU [2%@102,3%@102,1%@102,0%@102] EMC_FREQ 0%@204 GR3D_FREQ 0%@76 APE 25 PLL@23.5C CPU@24C PMIC@50C GPU@25.5C AO@32C thermal@24.5C RAM 493/1980MB (lfb 240x4MB) SWAP 0/5086MB (cached 0MB) IRAM 0/252kB(lfb 252kB) CPU [2%@102,2%@102,0%@102,0%@102] EMC_FREQ 0%@204 GR3D_FREQ 0%@76 APE 25 PLL@23.5C CPU@24C PMIC@50C GPU@25.5C AO@32C thermal@24.75C $ tegrastats RAM 475/1980MB (lfb 240x4MB) SWAP 0/5086MB (cached 0MB) CPU [2%@102,1%@102,0%@102,0%@102] EMC_FREQ 0% GR3D_FREQ 0% PLL@24C CPU@24C PMIC@50C GPU@26C AO@32C thermal@25C RAM 475/1980MB (lfb 240x4MB) SWAP 0/5086MB (cached 0MB) CPU [2%@102,1%@102,1%@102,0%@102] EMC_FREQ 0% GR3D_FREQ 0% PLL@24C CPU@24.5C PMIC@50C GPU@26C AO@32.5C thermal@25C |
[링크 : https://forums.developer.nvidia.com/t/gpu-usage-info-nvidia-smi-is-not-there/76155/5]
[링크 : https://m.blog.naver.com/zeta0807/222008386346]
jtop은 내장은 아니고 별도로 받아서 빌드해야 한다.
'embeded > jetson' 카테고리의 다른 글
| jetson nano developer board(구형) 부팅 문제 (0) | 2022.02.09 |
|---|---|
| nvidia jetson nano 2gb / csi (0) | 2022.01.21 |
| jetson nano 2g dev. kit 셋업 (0) | 2022.01.20 |
| jetson nano 켜보는데.. (0) | 2022.01.19 |
| jetson nano 2gb RTC? (0) | 2022.01.19 |
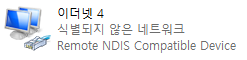
jetson nano의 커널은 올라오고 나서 인 것 같은데, 윈도우에서는 아래와 같은 장비들이 추가된다.
- linux gadget driver를 이용한 USB 스토리지 (Linux File-Stor Gadget USB Device)
- virtual control port(USB직렬 장치)
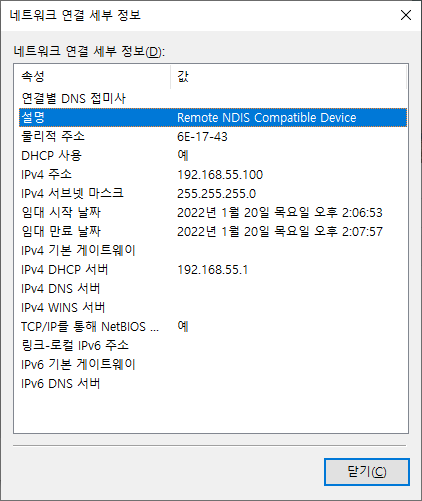
- 가상 네트워크 192.168.55.100 (Remote NDIS Compatible Device)
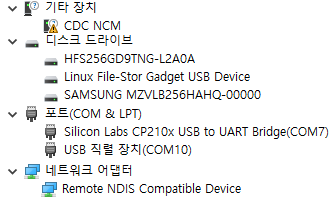
스토리지에도 먼가 나오긴 한데 딱히 눈에 띄는 건 없다.
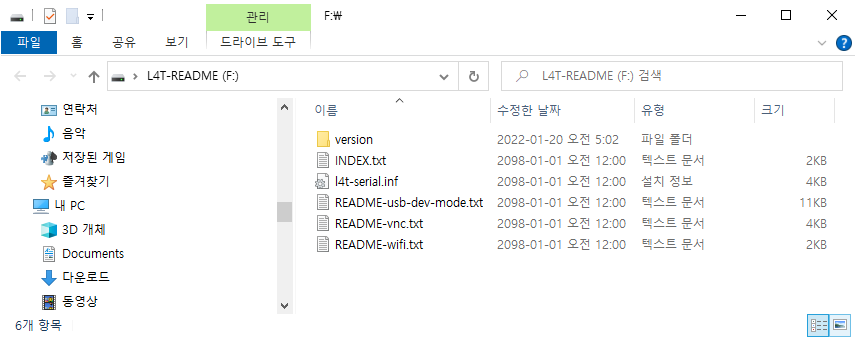
l4t-serial.inf 라고 VID는 맞는데 PID가 701A라서 7020으로 뜨는 CDC NCM은 정체를 모르겠다.
| [DeviceList] %ACMDevice%=DDInstall, USB\VID_0955&PID_701A&REV_0002&MI_02 [DeviceList.NTamd64] %ACMDevice%=DDInstall, USB\VID_0955&PID_701A&REV_0002&MI_02 |
아무튼 설치를 위해 microSD를 굽고 전원 on!
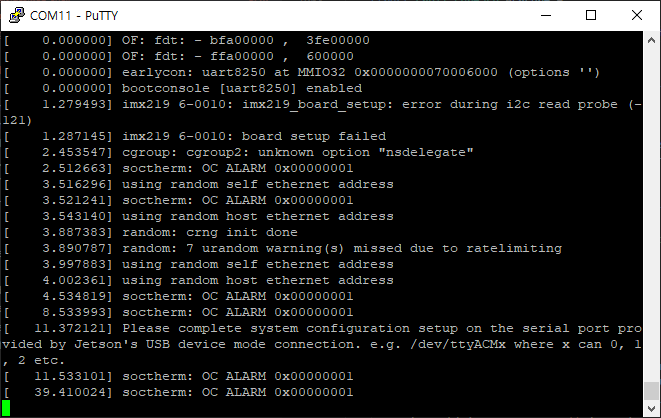
시리얼 콘솔(TTL, 출력 로그)
micro USB를 통한 virtual USB serial port
헤드리스 셋업을 위해서 사용하는데 반드시! "스페이스"를 눌러야 반응한다. -_-

다른건 그냥 무난한데.. 랜선을 안꽂고 해서 그런가 headless 설치시에는 NIC을 어떤걸 쓸지 물어본다.
귀찮으면 eth0 선택하고 랜선 꽂아주면 끝.

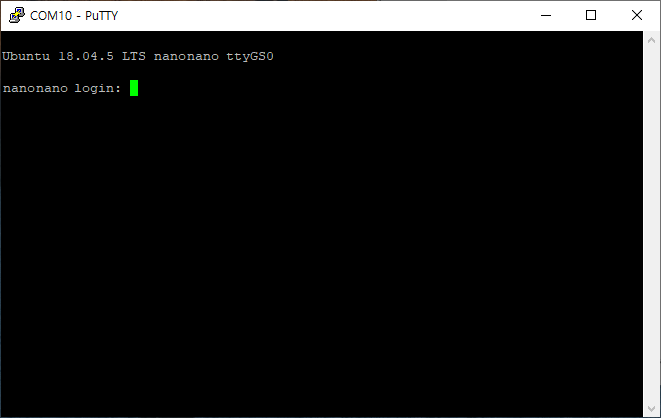
계정 생성후에는 아래와 같이 micro USB의 VCP를 통해 시리얼 콘솔로 접속할 수 있다
(물론 커널 메시지는 이쪽으로 출력되지 않는 시리얼 콘솔일 뿐)
그나저나 리눅스에서도 자동으로 192.168.55.100 으로 잡힌다는데
네트워크 장치에서 어떻게 ip를 설정되는지 원리가 궁금하네..
[링크 : https://developer.nvidia.com/embedded/learn/get-started-jetson-nano-2gb-devkit#setup]
'embeded > jetson' 카테고리의 다른 글
| nvidia jetson nano 2gb / csi (0) | 2022.01.21 |
|---|---|
| jetson nano gpu 사용 상태 확인 (0) | 2022.01.20 |
| jetson nano 켜보는데.. (0) | 2022.01.19 |
| jetson nano 2gb RTC? (0) | 2022.01.19 |
| nvidia jetson nano 2gb (0) | 2022.01.19 |

