'2021/06/28'에 해당되는 글 6건

  1. 2021.06.28 citcuitpyrhon joystick
  2. 2021.06.28 AVR V-USB (USB HID)
  3. 2021.06.28 rpi pico, circuitpython, USB HID
  4. 2021.06.28 rpi pico pinout
  5. 2021.06.28 rpi 3b+ with bt / uart
  6. 2021.06.28 esp32cam webservercam rtsp?
embeded/raspberry pi2021. 6. 28. 23:58

예제대로 넣으니까 먼가 뜨긴 한데

장치 관리자에서는 이정도 밖에 발견하지 못했고


시작에서 컨트롤러 쳐서 조이스틱 상태를 보니


오..?! CircuitPython HID 라는게 뜬다.

장치관리자에는 안보이던데 어딨냐 너 -_-


아무튼 이정도면 dog 훌륭아닌가?!

내 joytron 보다 더 많은 단추를 제공하는 느낌인데...

조금 아쉬운건 x/y/z 축은 있지만 시야는 없다는 정도?

[링크 : https://circuitpython.readthedocs.io/en/2.x/shared-bindings/gamepad/GamePad.html]


+

심심해서 usb_hid 와 gamepad 둘다 로드하니 순서와는 상관없이 gamepad만 뜬다.

조이스틱과 키보드 마우스 동시에 쓸 순 없나?

'embeded > raspberry pi' 카테고리의 다른 글

rpi 4 32bit / 64bit cpuinfo  (0) 2021.06.30
AArch64 linux cpu features  (0) 2021.06.30
rpi pico, circuitpython, USB HID  (0) 2021.06.28
rpi pico pinout  (0) 2021.06.28
rpi 3b+ with bt / uart  (0) 2021.06.28
Posted by 구차니
embeded/AVR (ATmega,ATtiny)2021. 6. 28. 22:19

attiny2313에 엣지 트리거 핀 하나 이용해서 USB 1.1 구현을 한 듯.

음.. atmega128 등에서는 못쓰는건가?

No UART, timer, input capture unit or other special hardware is required (except one edge triggered interrupt).

 [링크 : https://www.obdev.at/products/vusb/index.html]


Previous versions have been tested with IAR 4.10B/W32 and

[링크 : https://github.com/obdev/v-usb/blob/master/Readme.txt]

[링크 : https://github.com/obdev/v-usb]


다운로드 해서 보니 ATtny45 ATmega8에 대한 언급은 있는데

압축 파일 자체가 2012 인걸 봐서는.. 오랫동안 유지보수 안된 것 같긴하다..

[링크 : https://www.obdev.at/products/vusb/download.html]

'embeded > AVR (ATmega,ATtiny)' 카테고리의 다른 글

ATMEL AT32UC3A 시리즈  (0) 2023.07.04
AVR FFB(force feedback)  (0) 2021.06.29
avrisp mk2 / avrisp mk2 clone / stk500 clone  (0) 2017.11.21
avr unlock 관련  (0) 2017.11.21
avrdude + usbasp 테스트  (0) 2017.11.21
Posted by 구차니
embeded/raspberry pi2021. 6. 28. 16:14

usb hid 라이브러리

[링크 : https://circuitpython.org/libraries]

circuit python uf2 다운로드

[링크 : https://circuitpython.org/board/raspberry_pi_pico/]


step 1. circuit python uf2 파일 쓰기

BOOTSEL 누르고 부팅해서 adafruit-circuitpython-raspberry_pi_pico-en_US-6.3.0.uf2 파일을 드라이브에 던진다.


step 2. lib 복사

circuitpython이 설치되면 리부팅 되고 아래와 같은 구조의 디렉토리가 보이게 된다.

adafruit-circuitpython-bundle-6.x-mpy-20210625.zip 를 받아 zip 파일내의

adafruit_hid 디렉토리를 lib/adafruit_hid 에 복사한다.

[링크 : https://learn.adafruit.com/welcome-to-circuitpython/circuitpython-libraries]


step 3. code.py 작성

아래는 꽂으면 A만 미친듯이 눌러대는 녀석이다. (그러니 현재는 테러용 USB ㅋㅋ)

마치 shift가 눌린 것 처럼 작동하는데 코드는 좀 더 분석이 필요하다.

Import time

import board
import digitalio
import usb_hid
from adafruit_hid.keyboard import Keyboard
from adafruit_hid.keyboard_layout_us import KeyboardLayoutUS
from adafruit_hid.keycode import Keycode

# The Keycode sent for each button, will be paired with a control key
keys_pressed = [Keycode.A, "Hello World!\n"]
control_key = Keycode.SHIFT

# The keyboard object!
time.sleep(1)  # Sleep for a bit to avoid a race condition on some systems
keyboard = Keyboard(usb_hid.devices)
keyboard_layout = KeyboardLayoutUS(keyboard)  # We're in the US :)

while True:
    keyboard_layout.write('A')
    time.sleep(0.01)


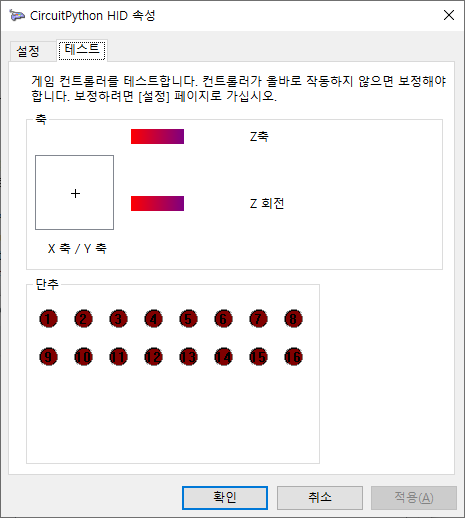
Hello world 출력하는 키보드(!) 예제 ㅋㅋ

import time

import board
import digitalio
import usb_hid
from adafruit_hid.keyboard import Keyboard
from adafruit_hid.keyboard_layout_us import KeyboardLayoutUS
from adafruit_hid.keycode import Keycode

# The keyboard object!
time.sleep(1)  # Sleep for a bit to avoid a race condition on some systems
keyboard = Keyboard(usb_hid.devices)
keyboard_layout = KeyboardLayoutUS(keyboard)  # We're in the US :)

while True:
    keyboard_layout.write('H')
    keyboard_layout.write('e')
    keyboard_layout.write('l')
    keyboard_layout.write('l')
    keyboard_layout.write('o')
    keyboard_layout.write(' ')
    keyboard_layout.write('w')
    keyboard_layout.write('o')
    keyboard_layout.write('r')
    keyboard_layout.write('l')
    keyboard_layout.write('d')
    time.sleep(1)

[링크 : https://tutorial.cytron.io/.../keyboard-emulator-using-raspberry-pi-pico-maker-pi-pico-and-circuitpython/]

[링크 : https://learn.adafruit.com/getting-started-with-raspberry-pi-pico-circuitpython]

[링크 : https://learn.adafruit.com/circuitpython-essentials/circuitpython-hid-keyboard-and-mouse]


'embeded > raspberry pi' 카테고리의 다른 글

AArch64 linux cpu features  (0) 2021.06.30
citcuitpyrhon joystick  (0) 2021.06.28
rpi pico pinout  (0) 2021.06.28
rpi 3b+ with bt / uart  (0) 2021.06.28
rpi pico USB OTG를 이용한 오실로스코프  (0) 2021.06.27
Posted by 구차니
embeded/raspberry pi2021. 6. 28. 11:51

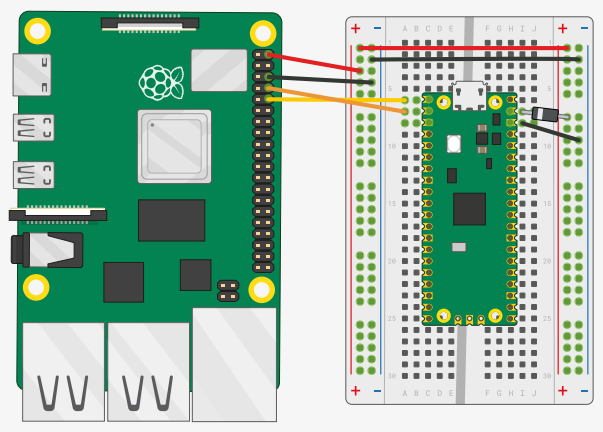
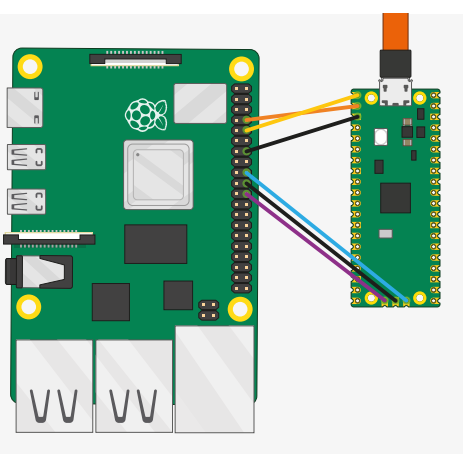
VBUS(GP40, 우측 상단)에 연결하면 USB Host 모드로만 작동해야 한다는 의미 같은데

아마 USB device 모드라면 USB를 통해 전원을 입력받아야 하기 때문이려나?

Whilst it is possible to connect the Raspberry Pi’s 5V pin to the Raspberry Pi Pico VBUS pin, this is not recommended.
Shorting the 5V rails together will mean that the Micro USB cannot be used. An exception is when using the Raspberry
Pi Pico in USB host mode, in this case 5V must be connected to the VBUS pin.
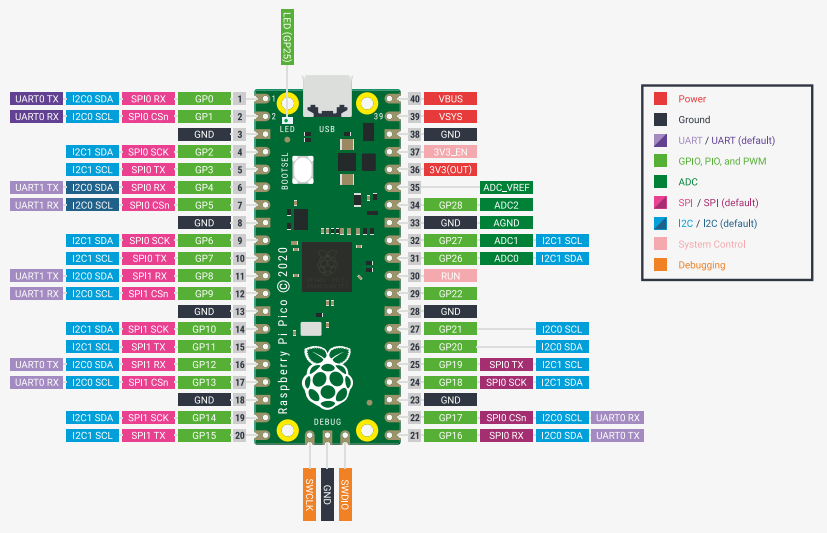


GP0이 TX GP1이 RX


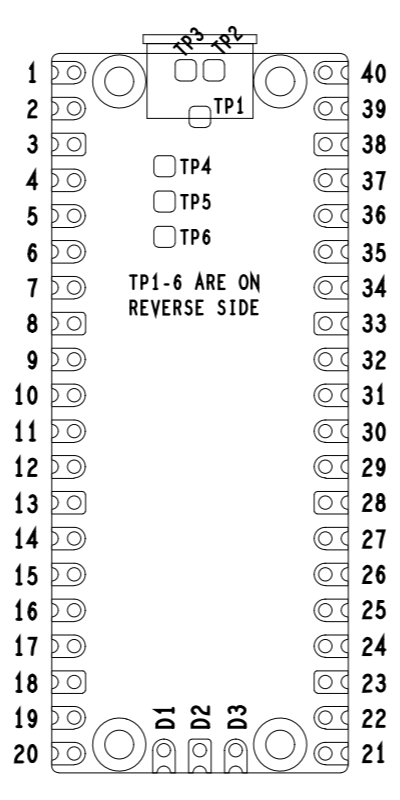
LED는 GPIO25에 연결되어 있고, TP5로도 연결이 되어있는데

BOOTSEL은 TP6에만 되어있고 GPIO로 연결은 되어 있지 않다.

TP1 – Ground (close coupled ground for differential USB signals)
TP2 – USB DM
TP3 – USB DP
TP4 – GPIO23/SMPS PS pin (do not use)
TP5 – GPIO25/LED (not recommended to be used)
TP6 – BOOTSEL

[링크 : https://www.raspberrypi-spy.co.uk/2021/01/pi-pico-pinout-and-power-pins/#prettyPhoto]


[링크 : https://datasheets.raspberrypi.org/pico/getting-started-with-pico.pdf]

'embeded > raspberry pi' 카테고리의 다른 글

citcuitpyrhon joystick  (0) 2021.06.28
rpi pico, circuitpython, USB HID  (0) 2021.06.28
rpi 3b+ with bt / uart  (0) 2021.06.28
rpi pico USB OTG를 이용한 오실로스코프  (0) 2021.06.27
rpi pico usb 저장소  (0) 2021.06.24
Posted by 구차니
embeded/raspberry pi2021. 6. 28. 11:44

라즈베리파이 3B를 사용중인데 ttyAMA0를 하니 minicom 자체가 먹통이 되서

rpi pico랑 연결하는글을 보다가 발견

$ minicom -b 115200 -o -D /dev/serial0

[링크 : https://datasheets.raspberrypi.org/pico/getting-started-with-pico.pdf]


흐음.. serial0을 쓰도록 해야 할 것 같네.

$ ls -al /dev/serial*
lrwxrwxrwx 1 root root  5 Jun 28 02:17 /dev/serial0 -> ttyS0
lrwxrwxrwx 1 root root  7 Jun 28 02:17 /dev/serial1 -> ttyAMA0


+

원래 시리얼통신 포트 이름은 /dev/ttyAMA0이다. 그런데 파이3에서는, 이전까지 /dev/ttyAMA0에 할당되어있던 시리얼포트가 블루투스에 할당되었다. 시리얼포트는 /dev/ttyS0로 옮겨졌다.

[링크 : http://lhdangerous.godohosting.com/wiki/index.php/라즈베리파이_시리얼_통신_설정...]

'embeded > raspberry pi' 카테고리의 다른 글

rpi pico, circuitpython, USB HID  (0) 2021.06.28
rpi pico pinout  (0) 2021.06.28
rpi pico USB OTG를 이용한 오실로스코프  (0) 2021.06.27
rpi pico usb 저장소  (0) 2021.06.24
rpi pico main.py 올리기 윈도우10, 우분투  (0) 2021.06.24
Posted by 구차니
embeded/esp322021. 6. 28. 11:11

http://ip << 웹기반 뷰어

http://ip:81/stream << 크롬 / vlc 스트리밍


물론(?) 당연히 한개 세션만 스트리밍 되는 한계로

웹에서 켜놓고 있으면 http://ip:81/stream 으로도 안나온다. -_-


[링크 : https://blog.naver.com/pa3018/221481983862]

[링크 : https://github.com/espressif/esp32-camera/issues/24]

'embeded > esp32' 카테고리의 다른 글

esp32 freertos  (0) 2021.07.07
esp32cam setting  (0) 2021.07.06
LDO 발열?  (0) 2021.06.25
esp32-cam camerawebserver  (0) 2021.06.24
esp32 cpu 사양 및 성능  (0) 2021.06.23
Posted by 구차니