rpiboot for windows
[링크 : https://github.com/raspberrypi/usbboot/raw/master/win32/rpiboot_setup.exe]
Compute Module 4Ensure the Compute Module is fitted correctly installed on the IO board. It should lie flat on the IO board.
|
[링크 : https://www.raspberrypi.org/documentation/hardware/computemodule/cm-emmc-flashing.md]
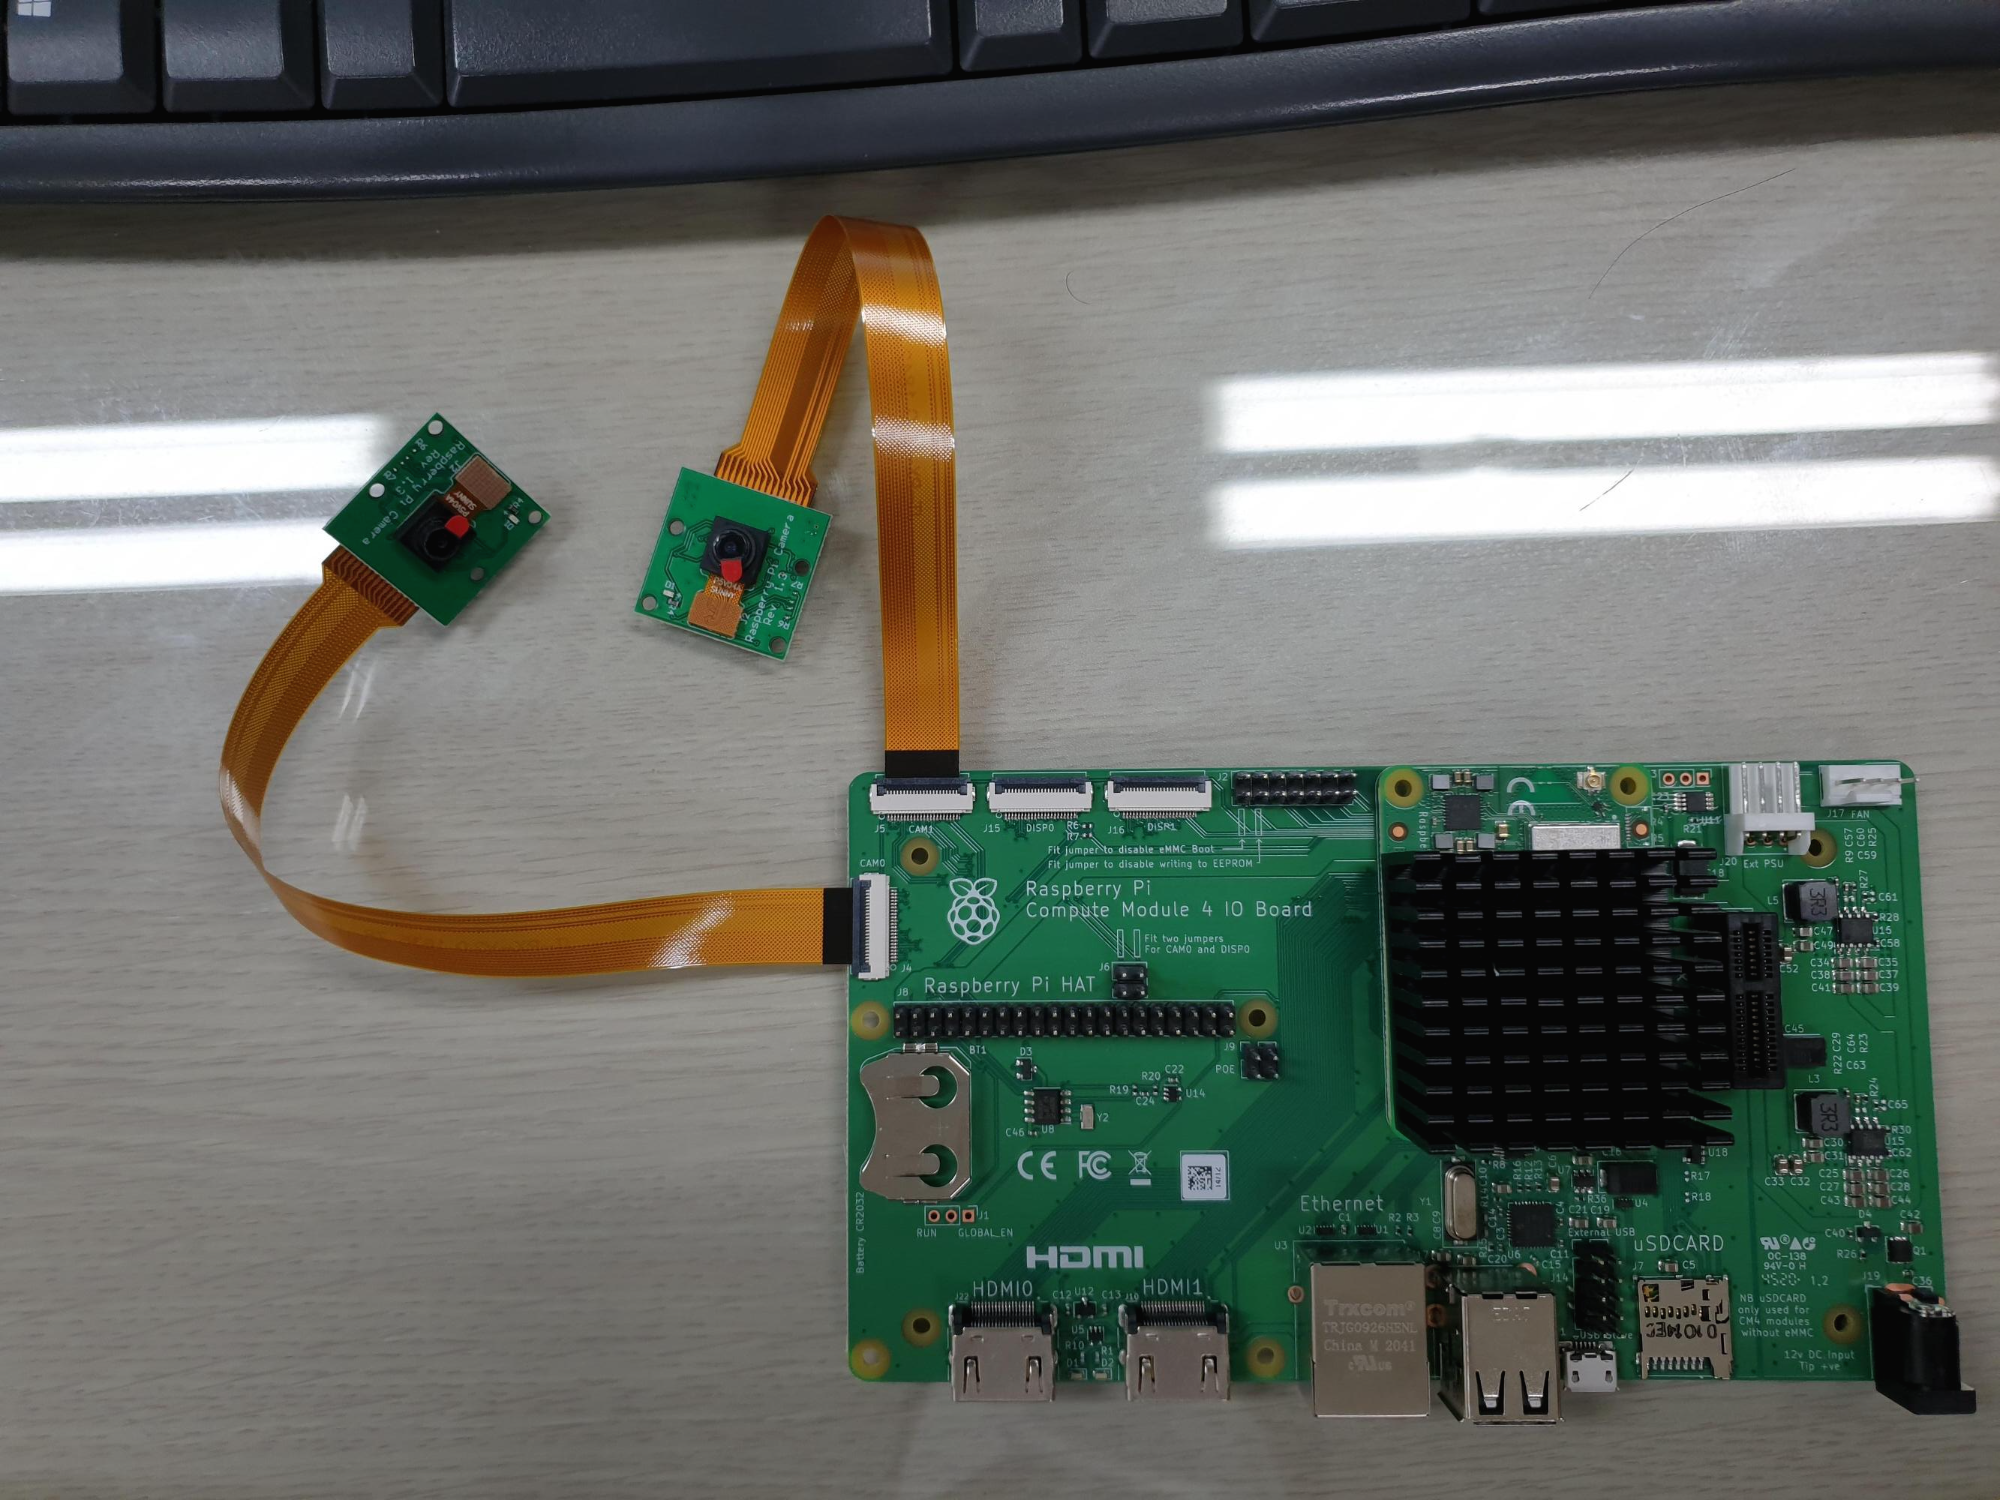
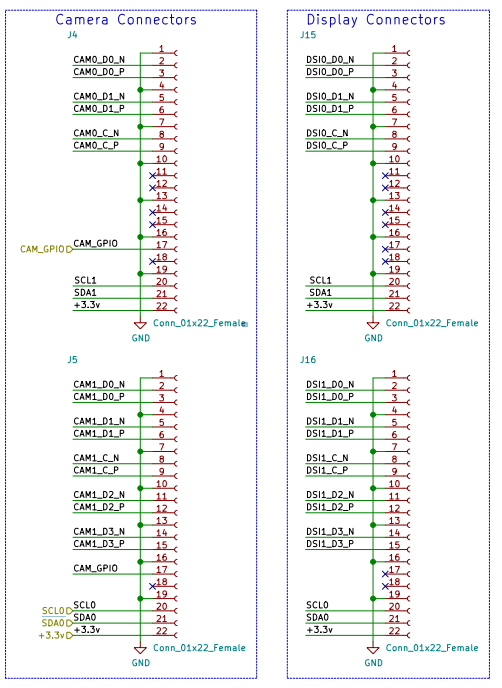
CAM0 / DISP0 사용하려면 J6 점퍼를 세로로 두개 달아야 한다는데
SCL1/SDA1이 연결되는걸 봐서는 i2c-1을 점유하게 되는 듯?
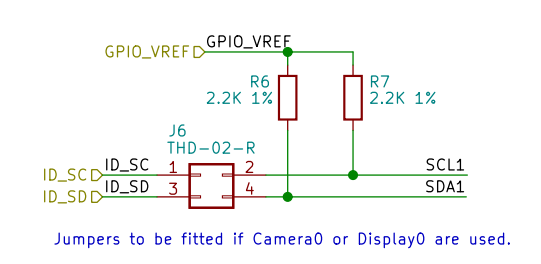
CAM1 / DISP1은 i2c-0 인 듯.
[링크 : https://datasheets.raspberrypi.org/cm4io/cm4io-datasheet.pdf]
cm4
J2 disable eMMC Boot 점퍼 연결(중앙 산단의 점퍼)
usb slave 와 pc 연결(하단 우측 1/4 지점)

rpiboot ready 실행하고
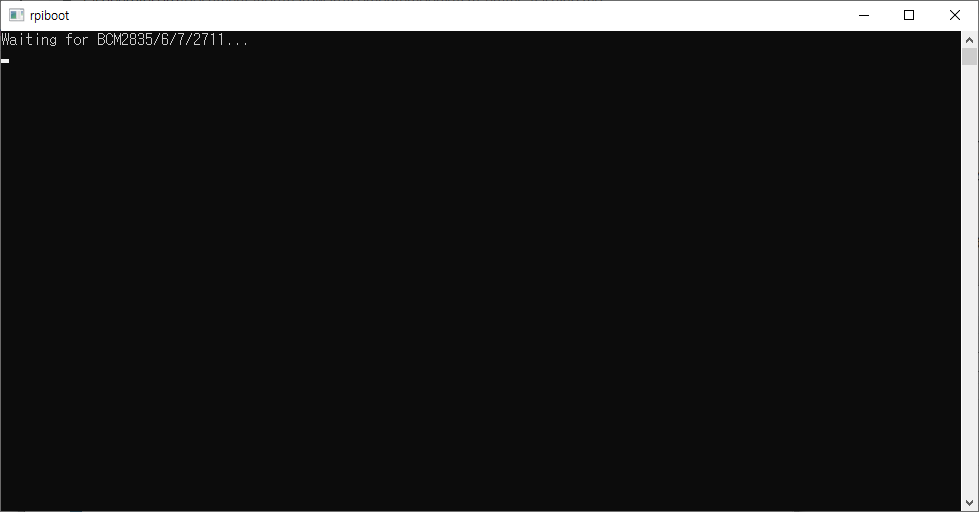
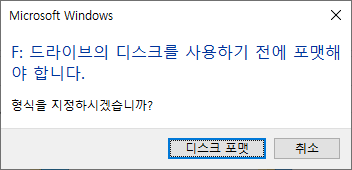
cm4 전원을 켜면 이런저런 펌웨어 올리고 USB 메모리 스틱처럼 인식된다.
포맷하라는걸 봐서는 ext인가 싶긴한데 나중에 다른 모듈을 리눅스에서 연결은 해봐야 할 듯..
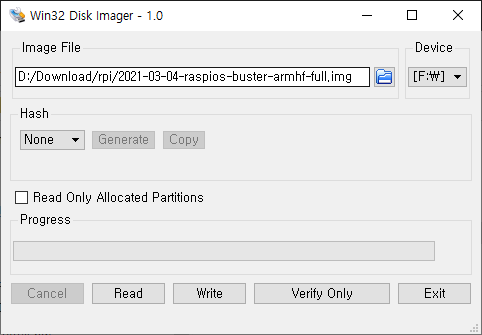
그럼 이제 이미지를 굽굽!
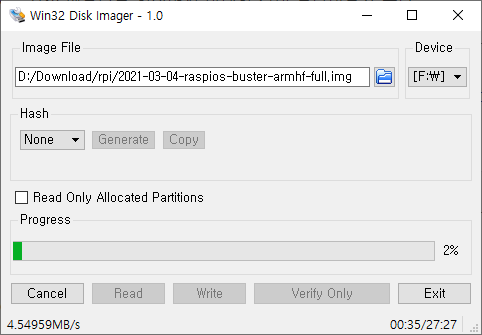
아니 왜.. uSD 보다 느리죠!?
아무튼 굽고 나서 다시 인식되면 boot 파티션이 인식되는데
dt-blob-dualcam.bin을 받아서 dt-blob.bin 으로 저장을 하면 dual CSI/DSI 쓸 준비 끝!
| sudo wget https://raw.githubusercontent.com/raspberrypi/documentation/master/hardware/computemodule/dt-blob-dualcam.bin -O /boot/dt-blob.bin |
[링크 : https://www.raspberrypi.org/documentation/hardware/computemodule/cmio-camera.md]
켜보니 USB가 인식 안된다 (야이 그지 깽깽이들아!!!)
dt-blob.bin을 받으면서 config.txt 가장 끝에 이걸 추가해는 걸 추천!
| dtoverlay=dwc2,dr_mode=host |
[링크 : https://www.jeffgeerling.com/.../usb-20-ports-not-working-on-compute-module-4-check-your-overlays]
눼.. 메뉴얼 정독 안한 제 잘못입니다 ㅠㅠ

[링크 : https://datasheets.raspberrypi.org/cm4io/cm4io-datasheet.pdf]
부팅하고 나서 파티션을 보니 /dev/mmcblk0 으로 연결이 똭!
| $ lsblk NAME MAJ:MIN RM SIZE RO TYPE MOUNTPOINT mmcblk0 179:0 0 29.1G 0 disk ├─mmcblk0p1 179:1 0 256M 0 part /boot └─mmcblk0p2 179:2 0 28.9G 0 part / mmcblk0boot0 179:32 0 4M 1 disk mmcblk0boot1 179:64 0 4M 1 disk |
| $ mount | grep mmc /dev/mmcblk0p2 on / type ext4 (rw,noatime) /dev/mmcblk0p1 on /boot type vfat (rw,relatime,fmask=0022,dmask=0022,codepage=437,iocharset=ascii,shortname=mixed,errors=remount-ro) |
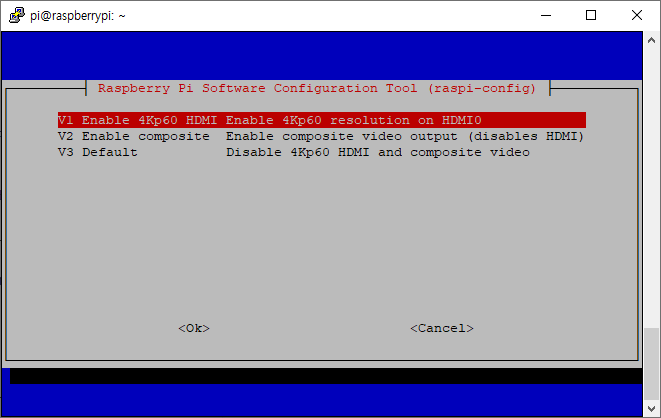
raspi-config 에서 camera on , i2c on 켠 상태면 아래와 같이 설정된다.
USB host를 사용하기 위한 dtoverlay와
CM4 보드에 장착된 RTC 및 팬 컨트롤러를 쓰기 위한 dtparam 설정은 파란색 으로 수동 추가해야 함.
| $ cat /boot/config.txt # For more options and information see # http://rpf.io/configtxt # Some settings may impact device functionality. See link above for details # uncomment if you get no picture on HDMI for a default "safe" mode #hdmi_safe=1 # uncomment this if your display has a black border of unused pixels visible # and your display can output without overscan #disable_overscan=1 # uncomment the following to adjust overscan. Use positive numbers if console # goes off screen, and negative if there is too much border #overscan_left=16 #overscan_right=16 #overscan_top=16 #overscan_bottom=16 # uncomment to force a console size. By default it will be display's size minus # overscan. #framebuffer_width=1280 #framebuffer_height=720 # uncomment if hdmi display is not detected and composite is being output #hdmi_force_hotplug=1 # uncomment to force a specific HDMI mode (this will force VGA) #hdmi_group=1 #hdmi_mode=1 # uncomment to force a HDMI mode rather than DVI. This can make audio work in # DMT (computer monitor) modes #hdmi_drive=2 # uncomment to increase signal to HDMI, if you have interference, blanking, or # no display #config_hdmi_boost=4 # uncomment for composite PAL #sdtv_mode=2 #uncomment to overclock the arm. 700 MHz is the default. #arm_freq=800 # Uncomment some or all of these to enable the optional hardware interfaces dtparam=i2c_arm=on #dtparam=i2s=on #dtparam=spi=on # Uncomment this to enable infrared communication. #dtoverlay=gpio-ir,gpio_pin=17 #dtoverlay=gpio-ir-tx,gpio_pin=18 # Additional overlays and parameters are documented /boot/overlays/README # Enable audio (loads snd_bcm2835) dtparam=audio=on [pi4] # Enable DRM VC4 V3D driver on top of the dispmanx display stack dtoverlay=vc4-fkms-v3d max_framebuffers=2 [all] #dtoverlay=vc4-fkms-v3d dtoverlay=dwc2,dr_mode=host start_x=1 gpu_mem=128 dtparam=i2c_vc=on |
일단 정상부팅되고 i2c도 다 올라왔나 보는데 i2c-0/1 뿐만 아니라 10/11이 추가되어있다.
| pi@raspberrypi:~ $ i2cdetect -y 0 0 1 2 3 4 5 6 7 8 9 a b c d e f 00: -- -- -- -- -- -- -- -- -- -- -- -- -- 10: -- -- -- -- -- -- -- -- -- -- -- -- -- -- -- -- 20: -- -- -- -- -- -- -- -- -- -- -- -- -- -- -- -- 30: -- -- -- -- -- -- -- -- -- -- -- -- -- -- -- -- 40: -- -- -- -- -- -- -- -- -- -- -- -- -- -- -- -- 50: -- -- -- -- -- -- -- -- -- -- -- -- -- -- -- -- 60: -- -- -- -- -- -- -- -- -- -- -- -- -- -- -- -- 70: -- -- -- -- -- -- -- -- pi@raspberrypi:~ $ i2cdetect -y 1 0 1 2 3 4 5 6 7 8 9 a b c d e f 00: -- -- -- -- -- -- -- -- -- -- -- -- -- 10: -- -- -- -- -- -- -- -- -- -- -- -- -- -- -- -- 20: -- -- -- -- -- -- -- -- -- -- -- -- -- -- -- -- 30: -- -- -- -- -- -- -- -- -- -- -- -- -- -- -- -- 40: -- -- -- -- -- -- -- -- -- -- -- -- -- -- -- -- 50: -- -- -- -- -- -- -- -- -- -- -- -- -- -- -- -- 60: -- -- -- -- -- -- -- -- -- -- -- -- -- -- -- -- 70: -- -- -- -- -- -- -- -- pi@raspberrypi:~ $ i2cdetect -y 10 0 1 2 3 4 5 6 7 8 9 a b c d e f 00: -- -- -- -- -- -- -- -- -- 0c -- -- -- 10: -- -- -- -- -- -- -- -- -- -- -- -- -- -- -- -- 20: -- -- -- -- -- -- -- -- -- -- -- -- -- -- -- 2f 30: -- -- -- -- -- -- -- -- -- -- -- -- -- -- -- -- 40: -- -- -- -- -- -- -- -- -- -- -- -- -- -- -- -- 50: -- 51 -- -- -- -- -- -- -- -- -- -- -- -- -- -- 60: -- -- -- -- -- -- -- -- -- -- -- -- -- -- -- -- 70: -- -- -- -- -- -- -- -- pi@raspberrypi:~ $ i2cdetect -y 11 0 1 2 3 4 5 6 7 8 9 a b c d e f 00: -- -- -- -- -- -- -- -- -- 0c -- -- -- 10: -- -- -- -- -- -- -- -- -- -- -- -- -- -- -- -- 20: -- -- -- -- -- -- -- -- -- -- -- -- -- -- -- 2f 30: -- -- -- -- -- -- -- -- -- -- -- -- -- -- -- -- 40: -- -- -- -- -- -- -- -- -- -- -- -- -- -- -- -- 50: -- 51 -- -- -- -- -- -- -- -- -- -- -- -- -- -- 60: -- -- -- -- -- -- -- -- -- -- -- -- -- -- -- -- 70: -- -- -- -- -- -- -- -- pi@raspberrypi:~ $ ls -al /dev/i2c* crw-rw---- 1 root i2c 89, 0 Jun 9 18:27 /dev/i2c-0 crw-rw---- 1 root i2c 89, 1 Jun 9 18:27 /dev/i2c-1 crw-rw---- 1 root i2c 89, 10 Jun 9 18:27 /dev/i2c-10 crw-rw---- 1 root i2c 89, 11 Jun 9 18:27 /dev/i2c-11 |
+
0x0C 는 누구냐... -_-?
| To enable the I2C bus to the RTC you will need dtparam=i2c_vc=on set in config.txt . The RTC then will be on i2c-10 address 0x51 ( 7bit address) To enable the I2C bus to the fan controller you will need dtparam=i2c_vc=on set in config.txt . The fan controller then will be on i2c-10 address 0x2f ( 7bit address) |
[링크 : https://datasheets.raspberrypi.org/cm4io/cm4io-datasheet.pdf]
[링크 : https://datasheets.raspberrypi.org/cm4/cm4-datasheet.pdf]
+
2021.06.10
리눅스에서 해봄
libusb의 경우 이전에 RTL-SDR 한다고 설치되어 있어서 설치 안하고 된 듯.
2GB RAM / 8GB eMMC 모델인데
마운트 하려고 시도해보니 파티션도 없고 빈 eMMC 인것 같은데
도대체 라즈베리 4에서 전원 넣으면 뜨는 GUI 부트로더는 어디에 들어있는거냐?!?!
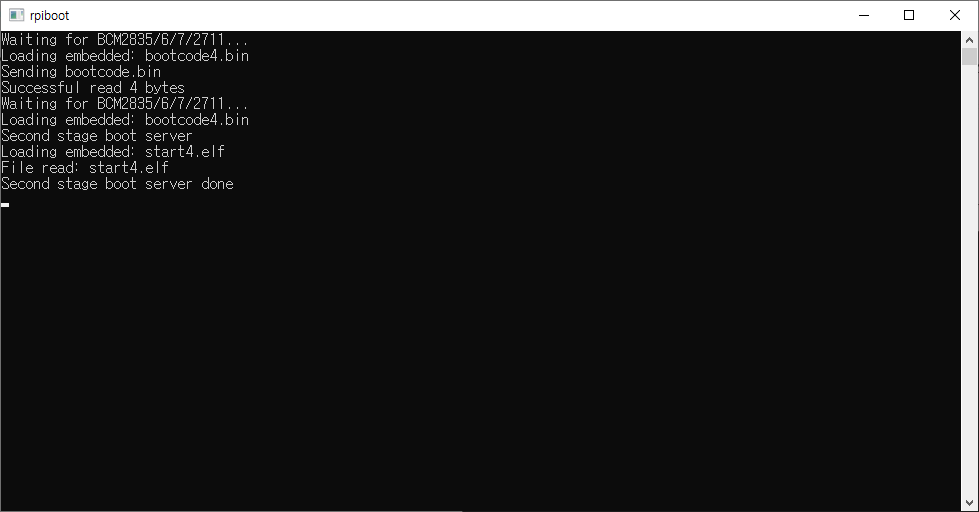
| $ sudo apt install libusb-1.0-0-dev $ git clone https://github.com/raspberrypi/usbboot $ cd usbboot $ sudo ./rpiboot Waiting for BCM2835/6/7/2711... Loading embedded: bootcode4.bin Sending bootcode.bin Successful read 4 bytes Waiting for BCM2835/6/7/2711... Loading embedded: bootcode4.bin Second stage boot server Loading embedded: start4.elf File read: start4.elf Second stage boot server done $ lsblk NAME MAJ:MIN RM SIZE RO TYPE MOUNTPOINT sdb 8:16 1 7.3G 0 disk $ sudo fdisk -l /dev/sdb Disk /dev/sdb: 7.29 GiB, 7818182656 bytes, 15269888 sectors Disk model: 0001 Units: sectors of 1 * 512 = 512 bytes Sector size (logical/physical): 512 bytes / 512 bytes I/O size (minimum/optimal): 512 bytes / 512 bytes $ sudo mount /dev/sdb /mnt/ NTFS signature is missing. Failed to mount '/dev/sdb': 부적절한 인수 The device '/dev/sdb' doesn't seem to have a valid NTFS. Maybe the wrong device is used? Or the whole disk instead of a partition (e.g. /dev/sda, not /dev/sda1)? Or the other way around? |
+
rpi4는 SPI EEPROM 512KB(4Mbit) 짜리 달려있고 거기에 bootcode.bin이 들어있다고
다만 SD에 있을 경우 내장 bootcode.bin은 무시되는 듯.
[링크 : https://www.raspberrypi.org/documentation/hardware/raspberrypi/booteeprom.md]
'embeded > raspberry pi' 카테고리의 다른 글
| bmp280 (0) | 2021.06.09 |
|---|---|
| 어?! 지름 망 ㅋㅋㅋ TEA5676 (0) | 2021.06.09 |
| 라즈베리 Zero용 CSI FPCB 케이블 도착 (0) | 2021.06.08 |
| 라즈베리 i2c 센서 작동 확인 (0) | 2021.06.05 |
| 센서 스펙 (0) | 2021.06.05 |