embeded/raspberry pi2021. 6. 9. 21:38

대충봐서는 랜선을 통해 고정밀 NT P를 구현하는 느낌인데..

어떤식으로 하드웨어가 구성되고

어떤식으로 정보를 입수하는진 감이 안오네..


[링크 : https://www.flirkorea.com/discover/iis/machine-vision/precision-system-synchronization-with-the-ieee-1588-precision-time-protocol-ptp/]

[링크 : https://en.wikipedia.org/wiki/Precision_Time_Protocol]


+

[링크 : https://www.raspberrypi.org/forums/viewtopic.php?t=295829]


+ 210610

[링크 : https://en.m.wikipedia.org/wiki/List_of_PTP_implementations]

[링크 : https://github.com/raspberrypi/linux/issues/4151]

[링크 : https://cezacx2.tistory.com/1243]


'embeded > raspberry pi' 카테고리의 다른 글

cm4 태워먹음 ㅠㅠ  (0) 2021.06.11
cm4 rtc pcf85063a  (0) 2021.06.10
raspivid camera select  (0) 2021.06.09
bmp280  (0) 2021.06.09
어?! 지름 망 ㅋㅋㅋ TEA5676  (0) 2021.06.09
Posted by 구차니
embeded/raspberry pi2021. 6. 9. 19:20

퇴근직전 30분 알차게 딴짓아닌 딴짓을 하고 있었는데

라즈베리 4 compute module 에 CSI 2개 동시 출력은 일단 cs 옵션을 찾아 성공

하지만 듀얼 모니터임에도 각각 모니터에 띄울수가 없어서 멘붕 중

--camselect,    -cs
Selects which camera to use on a multi-camera system. Use 0 or 1.

[링크 : https://www.raspberrypi.org/documentation/raspbian/applications/camera.md]


dn 옵션까진 찾았는데 0,1,2 만 시도했는데 안되서 좌절..

There was this commit. I think it can be done by just adding "-dn 7" to raspivid to display the preview on the second HDMI monitor.

[링크 : https://www.raspberrypi.org/forums/viewtopic.php?t=298292]


7까지 갈 생각은 못했네 -_-

도대체 저 인덱스는 어디서 굴러나온건지 소스에서 봐도 이해가 안되네?

Allows options like -dn 7 to push the preview onto HDMI1.
Values are Dispmanx display enums, therefore predominantly
0 = DSI/DPI LCD
2 = HDMI0
3 = SDTV
7 = HDMI1
Behaviour should the chosen display not be present should be to
revert to the primary display that is present.

[링크 : https://github.com/raspberrypi/userland/commit/2549c149d8aa7f18ff201a1c0429cb26f9e2535a]


+

2021.06.10

-dn 7 하니 HDMI1로 출력 잘된다.

다만 -3d sbs 옵션을 하는데 단일 카메라로만 되서

2개 카메라를 scaling 후 합치는건 따로 소스를 수정해 봐야 할지도?

'embeded > raspberry pi' 카테고리의 다른 글

cm4 rtc pcf85063a  (0) 2021.06.10
ETH SYNC / IEEE 1588 / PTP  (2) 2021.06.09
bmp280  (0) 2021.06.09
어?! 지름 망 ㅋㅋㅋ TEA5676  (0) 2021.06.09
cm4 io board / rpiboot  (2) 2021.06.09
Posted by 구차니
embeded/raspberry pi2021. 6. 9. 19:18

글들을 찾다보니 BME 시리즈를 알게 되었는데 얘는 습도까지 측정이 가능하다고.

[링크 : https://zelkun.tistory.com/entry/024-Arduino-아두이노-bme280-bmp280-센서모듈...]


일단 라이브러리는 찾았는데.. 언제 써보나?

[링크 : https://github.com/pimoroni/bmp280-python]


새끼 손톱 정도 크기인데

오른쪽 보드는 BMP280 보드. 얘는 그래도 2.54mm 인데 TEA5767은 2.0mm 피치 인듯.

그나저나 5개 정도 핀.. 커야 12mm * 12mm 인데 내 실력으로는 납땜이 불가능 ㅠㅠ


BMP280은  BMP180 보다 더 작아지고 전기도 더 조금 먹고 더 정밀해졌다.

[링크 : https://cdn-shop.adafruit.com/datasheets/BST-BMP280-DS001-11.pdf]


+

2021.06.12

거실 온도계는 25도. 포탈상의 온도는 22도.

일단 그래도 집에 있는 빨간색 구형 온도계 믿을만 하겠지?

bmp180 보다는 신뢰할만한 값인것 같은데. 땜질하다 열 받아서 그런 오차값이 나온걸까? 아니면 장비 편차일까?

$ python3 temperature-and-pressure.py
temperature-and-pressure.py - Displays the temperature and pressure.

Press Ctrl+C to exit!


23.85*C 875.68hPa
25.99*C 1009.53hPa
26.00*C 1009.53hPa
26.01*C 1009.54hPa
26.02*C 1009.53hPa
26.02*C 1009.53hPa
26.02*C 1009.53hPa


$ python3 ./dump-calibration.py
dump-calibration.py - Dumps calibration data.

Press Ctrl+C to exit!


dig_p1 = 36547
dig_p2 = -10872
dig_p3 = 3024
dig_p4 = 665
dig_p5 = 345
dig_p6 = -7
dig_p7 = 15500
dig_p8 = -14600
dig_p9 = 6000
dig_t1 = 28077
dig_t2 = 26730
dig_t3 = -1000


$ python3 ./relative-altitude.py
relative-altitude.py - Calculates relative altitude from pressure.

Press Ctrl+C to exit!


Collecting baseline values for 100 seconds. Do not move the sensor!

Relative altitude: -0.32 metres
Relative altitude: -0.30 metres
Relative altitude: -0.19 metres
Relative altitude: -0.18 metres
Relative altitude: -0.22 metres
Relative altitude: -0.10 metres


두 녀석은 왜 안되는걸까?

$ python3 ./compensated-temperature.py
compensated-temperature.py - Use the CPU temperature to compensate temperature
readings from the BMP280 sensor. Method adapted from Initial State's Enviro pHAT
review: https://medium.com/@InitialState/tutorial-review-enviro-phat-for-raspberry-pi-4cd6d8c63441

Press Ctrl+C to exit!


Traceback (most recent call last):
  File "./compensated-temperature.py", line 36, in <module>
    cpu_temp = get_cpu_temperature()
  File "./compensated-temperature.py", line 28, in get_cpu_temperature
    return float(output[output.index('=') + 1:output.rindex("'")])
TypeError: argument should be integer or bytes-like object, not 'str'


$ python3 ./temperature-forced-mode.py
Traceback (most recent call last):
  File "./temperature-forced-mode.py", line 16, in <module>
    bmp280.setup(mode="forced")
TypeError: setup() got an unexpected keyword argument 'mode'

'embeded > raspberry pi' 카테고리의 다른 글

ETH SYNC / IEEE 1588 / PTP  (2) 2021.06.09
raspivid camera select  (0) 2021.06.09
어?! 지름 망 ㅋㅋㅋ TEA5676  (0) 2021.06.09
cm4 io board / rpiboot  (2) 2021.06.09
라즈베리 Zero용 CSI FPCB 케이블 도착  (0) 2021.06.08
Posted by 구차니
embeded/raspberry pi2021. 6. 9. 17:31

TEA5676 크진 않을거라고 생각했지만

그래도 보드까지 해서 1cm 정도 밖에 안되면 내 똥손으로는 땜을 할 수 가 없잖아 ㅠㅠ

아무튼 다른 보드랑 비교해보니 2mm pitch 핀헤더 1개 정도 되니 대충 12mm * 12mm 정도 되는 느낌.


[링크 : https://os.mbed.com/users/edodm85/notebook/radio-fm-tea5767/]


+

2022.08.08

[링크 : https://ko.aliexpress.com/item/1833463780.html?spm=a2g0o.ppclist.product.4.2275Gtd2Gtd2jm&pdp_npi=2%40dis%21KRW%21%E2%82%A9%201%2C873%21%E2%82%A9%2019%21%21%21%21%21%402101d1c316599250757271873ebc61%2151070340715%21btf&_t=pvid%3A5838401c-83f3-46ef-8232-97347aa07f20&afTraceInfo=1833463780__pc__pcBridgePPC__xxxxxx__1659925075&gatewayAdapt=glo2kor]

'embeded > raspberry pi' 카테고리의 다른 글

raspivid camera select  (0) 2021.06.09
bmp280  (0) 2021.06.09
cm4 io board / rpiboot  (2) 2021.06.09
라즈베리 Zero용 CSI FPCB 케이블 도착  (0) 2021.06.08
라즈베리 i2c 센서 작동 확인  (0) 2021.06.05
Posted by 구차니
embeded/raspberry pi2021. 6. 9. 13:48

rpiboot for windows

[링크 : https://github.com/raspberrypi/usbboot/raw/master/win32/rpiboot_setup.exe]


Compute Module 4

Ensure the Compute Module is fitted correctly installed on the IO board. It should lie flat on the IO board.
  • Make sure that nRPI_BOOT which is J2 (disable eMMC Boot) on the IO board is set to the 'EN' position.
  • Use a micro USB cable to connect the micro USB slave port J11 on IO board to the host device.
  • Do not power up yet.

[링크 : https://www.raspberrypi.org/documentation/hardware/computemodule/cm-emmc-flashing.md]


CAM0 / DISP0 사용하려면 J6 점퍼를 세로로 두개 달아야 한다는데

SCL1/SDA1이 연결되는걸 봐서는 i2c-1을 점유하게 되는 듯?

CAM1 / DISP1은 i2c-0 인 듯.

[링크 : https://datasheets.raspberrypi.org/cm4io/cm4io-datasheet.pdf]


cm4

J2 disable eMMC Boot 점퍼 연결(중앙 산단의 점퍼)

usb slave 와 pc 연결(하단 우측 1/4 지점)


rpiboot ready 실행하고


cm4 전원을 켜면 이런저런 펌웨어 올리고 USB 메모리 스틱처럼 인식된다.


포맷하라는걸 봐서는 ext인가 싶긴한데 나중에 다른 모듈을  리눅스에서 연결은 해봐야 할 듯..


그럼 이제 이미지를 굽굽!


아니 왜.. uSD 보다 느리죠!?


아무튼 굽고 나서 다시 인식되면 boot 파티션이 인식되는데

dt-blob-dualcam.bin을 받아서 dt-blob.bin 으로 저장을 하면 dual CSI/DSI 쓸 준비 끝!

sudo wget https://raw.githubusercontent.com/raspberrypi/documentation/master/hardware/computemodule/dt-blob-dualcam.bin -O /boot/dt-blob.bin

[링크 : https://www.raspberrypi.org/documentation/hardware/computemodule/cmio-camera.md]


켜보니 USB가 인식 안된다 (야이 그지 깽깽이들아!!!)

dt-blob.bin을 받으면서 config.txt 가장 끝에 이걸 추가해는 걸 추천!

dtoverlay=dwc2,dr_mode=host

[링크 : https://www.jeffgeerling.com/.../usb-20-ports-not-working-on-compute-module-4-check-your-overlays]


눼.. 메뉴얼 정독 안한 제 잘못입니다 ㅠㅠ

[링크 : https://datasheets.raspberrypi.org/cm4io/cm4io-datasheet.pdf]


부팅하고 나서 파티션을 보니 /dev/mmcblk0 으로 연결이 똭!

$ lsblk
NAME         MAJ:MIN RM  SIZE RO TYPE MOUNTPOINT
mmcblk0      179:0    0 29.1G  0 disk
├─mmcblk0p1  179:1    0  256M  0 part /boot
└─mmcblk0p2  179:2    0 28.9G  0 part /
mmcblk0boot0 179:32   0    4M  1 disk
mmcblk0boot1 179:64   0    4M  1 disk


$ mount | grep mmc
/dev/mmcblk0p2 on / type ext4 (rw,noatime)
/dev/mmcblk0p1 on /boot type vfat (rw,relatime,fmask=0022,dmask=0022,codepage=437,iocharset=ascii,shortname=mixed,errors=remount-ro)


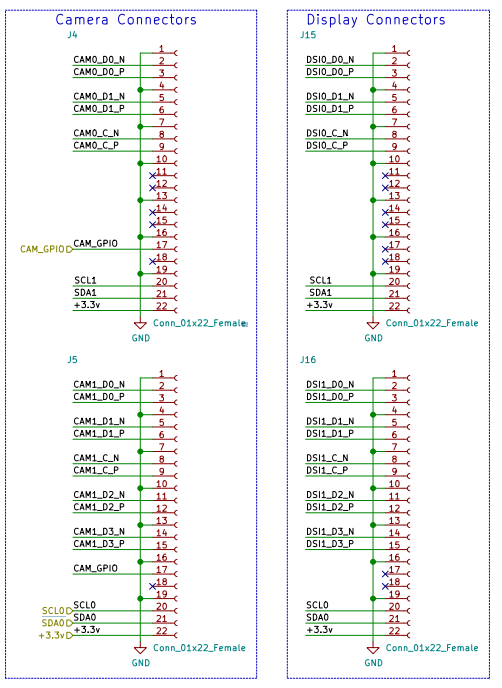
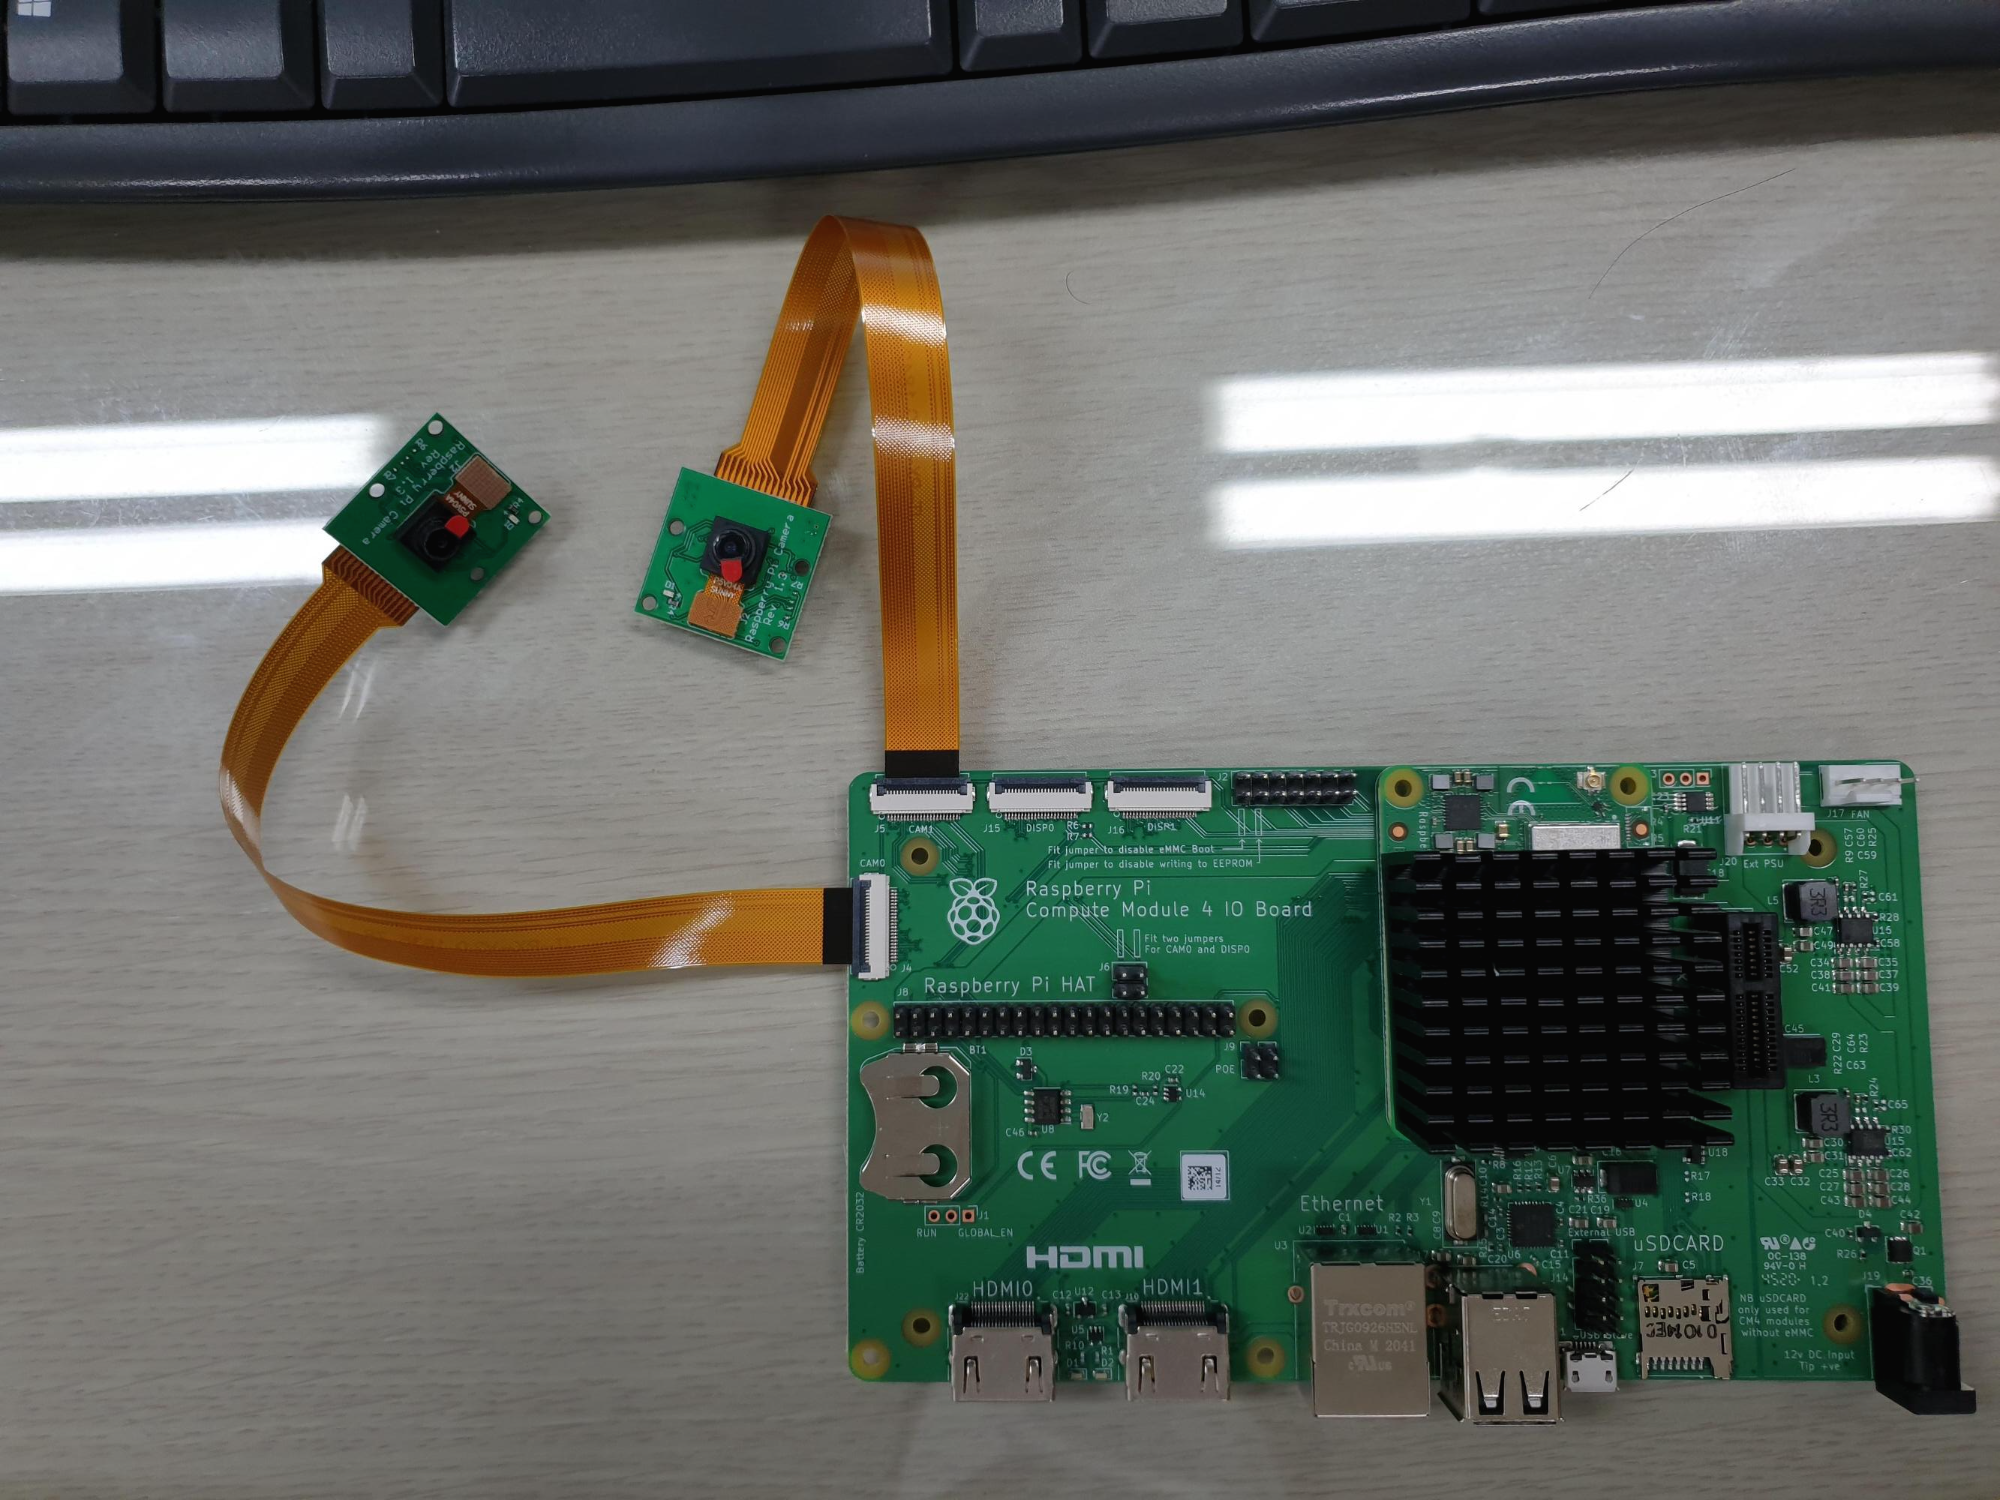
raspi-config 에서 camera on , i2c on 켠 상태면 아래와 같이 설정된다.

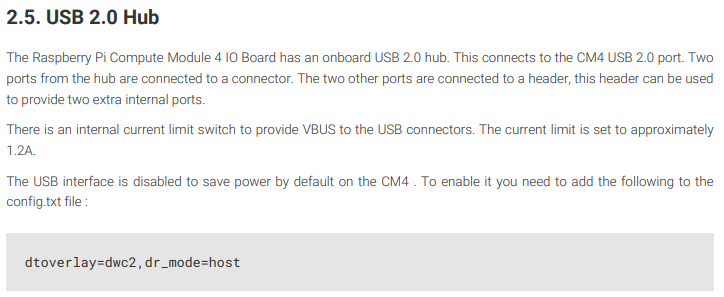
USB host를 사용하기 위한 dtoverlay와

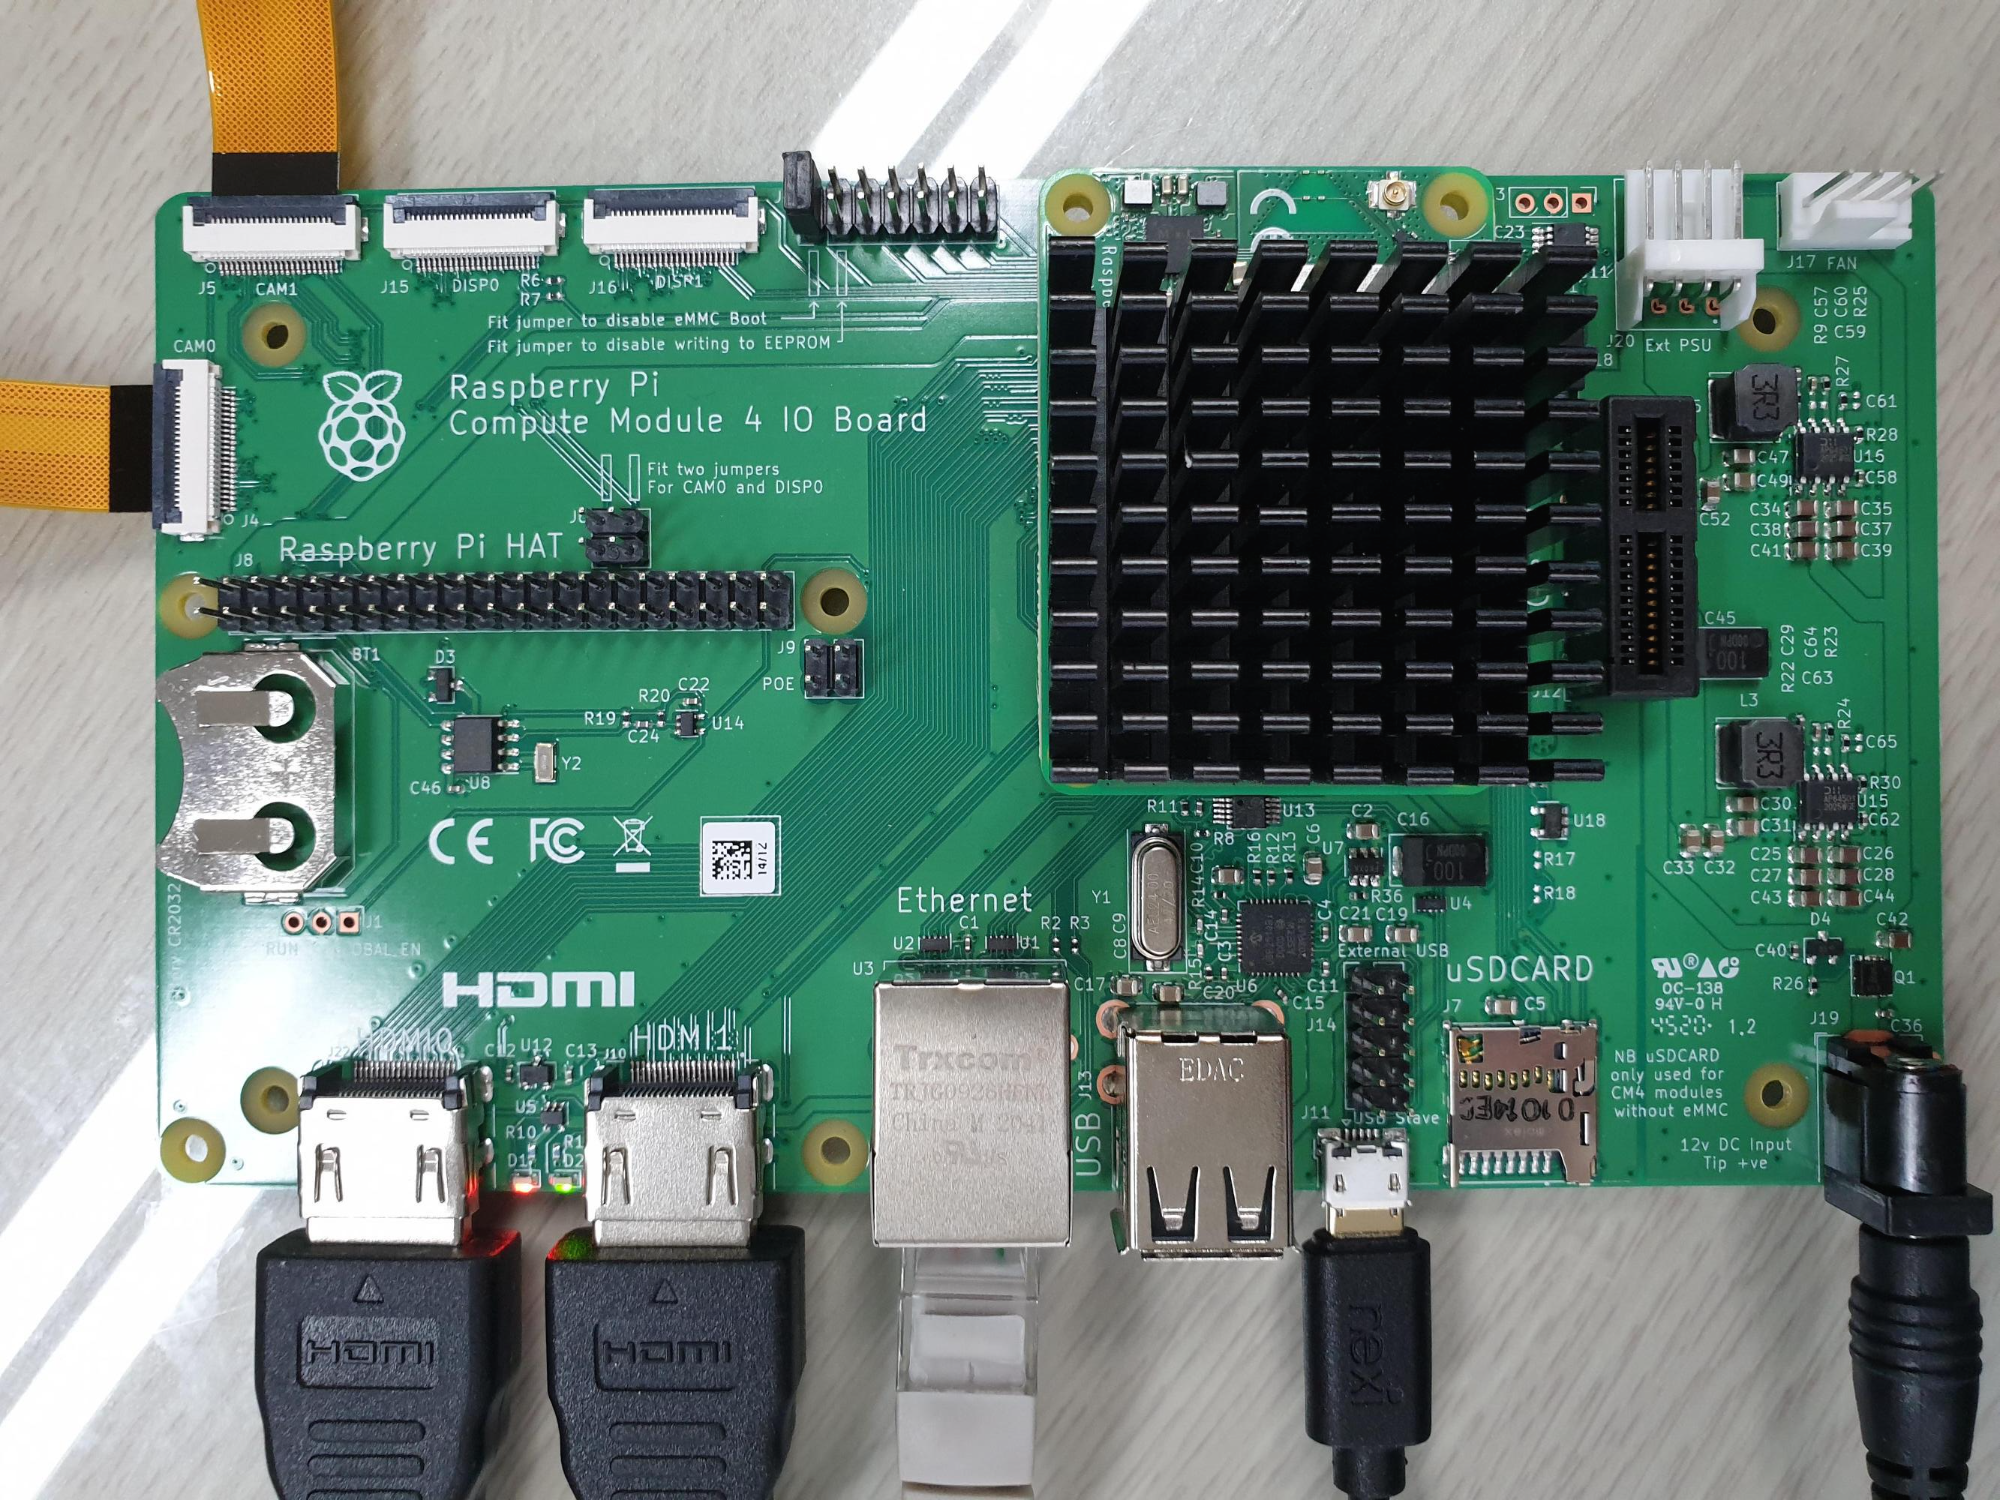
CM4 보드에 장착된 RTC 및 팬 컨트롤러를 쓰기 위한 dtparam 설정은 파란색 으로 수동 추가해야 함.

$ cat /boot/config.txt
# For more options and information see
# http://rpf.io/configtxt
# Some settings may impact device functionality. See link above for details

# uncomment if you get no picture on HDMI for a default "safe" mode
#hdmi_safe=1

# uncomment this if your display has a black border of unused pixels visible
# and your display can output without overscan
#disable_overscan=1

# uncomment the following to adjust overscan. Use positive numbers if console
# goes off screen, and negative if there is too much border
#overscan_left=16
#overscan_right=16
#overscan_top=16
#overscan_bottom=16

# uncomment to force a console size. By default it will be display's size minus
# overscan.
#framebuffer_width=1280
#framebuffer_height=720

# uncomment if hdmi display is not detected and composite is being output
#hdmi_force_hotplug=1

# uncomment to force a specific HDMI mode (this will force VGA)
#hdmi_group=1
#hdmi_mode=1

# uncomment to force a HDMI mode rather than DVI. This can make audio work in
# DMT (computer monitor) modes
#hdmi_drive=2

# uncomment to increase signal to HDMI, if you have interference, blanking, or
# no display
#config_hdmi_boost=4

# uncomment for composite PAL
#sdtv_mode=2

#uncomment to overclock the arm. 700 MHz is the default.
#arm_freq=800

# Uncomment some or all of these to enable the optional hardware interfaces
dtparam=i2c_arm=on
#dtparam=i2s=on
#dtparam=spi=on

# Uncomment this to enable infrared communication.
#dtoverlay=gpio-ir,gpio_pin=17
#dtoverlay=gpio-ir-tx,gpio_pin=18

# Additional overlays and parameters are documented /boot/overlays/README

# Enable audio (loads snd_bcm2835)
dtparam=audio=on

[pi4]
# Enable DRM VC4 V3D driver on top of the dispmanx display stack
dtoverlay=vc4-fkms-v3d
max_framebuffers=2

[all]
#dtoverlay=vc4-fkms-v3d
dtoverlay=dwc2,dr_mode=host
start_x=1
gpu_mem=128
dtparam=i2c_vc=on


일단 정상부팅되고 i2c도 다 올라왔나 보는데  i2c-0/1 뿐만 아니라 10/11이 추가되어있다.

pi@raspberrypi:~ $ i2cdetect -y 0
     0  1  2  3  4  5  6  7  8  9  a  b  c  d  e  f
00:          -- -- -- -- -- -- -- -- -- -- -- -- --
10: -- -- -- -- -- -- -- -- -- -- -- -- -- -- -- --
20: -- -- -- -- -- -- -- -- -- -- -- -- -- -- -- --
30: -- -- -- -- -- -- -- -- -- -- -- -- -- -- -- --
40: -- -- -- -- -- -- -- -- -- -- -- -- -- -- -- --
50: -- -- -- -- -- -- -- -- -- -- -- -- -- -- -- --
60: -- -- -- -- -- -- -- -- -- -- -- -- -- -- -- --
70: -- -- -- -- -- -- -- --
pi@raspberrypi:~ $ i2cdetect -y 1
     0  1  2  3  4  5  6  7  8  9  a  b  c  d  e  f
00:          -- -- -- -- -- -- -- -- -- -- -- -- --
10: -- -- -- -- -- -- -- -- -- -- -- -- -- -- -- --
20: -- -- -- -- -- -- -- -- -- -- -- -- -- -- -- --
30: -- -- -- -- -- -- -- -- -- -- -- -- -- -- -- --
40: -- -- -- -- -- -- -- -- -- -- -- -- -- -- -- --
50: -- -- -- -- -- -- -- -- -- -- -- -- -- -- -- --
60: -- -- -- -- -- -- -- -- -- -- -- -- -- -- -- --
70: -- -- -- -- -- -- -- --
pi@raspberrypi:~ $ i2cdetect -y 10
     0  1  2  3  4  5  6  7  8  9  a  b  c  d  e  f
00:          -- -- -- -- -- -- -- -- -- 0c -- -- --
10: -- -- -- -- -- -- -- -- -- -- -- -- -- -- -- --
20: -- -- -- -- -- -- -- -- -- -- -- -- -- -- -- 2f
30: -- -- -- -- -- -- -- -- -- -- -- -- -- -- -- --
40: -- -- -- -- -- -- -- -- -- -- -- -- -- -- -- --
50: -- 51 -- -- -- -- -- -- -- -- -- -- -- -- -- --
60: -- -- -- -- -- -- -- -- -- -- -- -- -- -- -- --
70: -- -- -- -- -- -- -- --
pi@raspberrypi:~ $ i2cdetect -y 11
     0  1  2  3  4  5  6  7  8  9  a  b  c  d  e  f
00:          -- -- -- -- -- -- -- -- -- 0c -- -- --
10: -- -- -- -- -- -- -- -- -- -- -- -- -- -- -- --
20: -- -- -- -- -- -- -- -- -- -- -- -- -- -- -- 2f
30: -- -- -- -- -- -- -- -- -- -- -- -- -- -- -- --
40: -- -- -- -- -- -- -- -- -- -- -- -- -- -- -- --
50: -- 51 -- -- -- -- -- -- -- -- -- -- -- -- -- --
60: -- -- -- -- -- -- -- -- -- -- -- -- -- -- -- --
70: -- -- -- -- -- -- -- --
pi@raspberrypi:~ $ ls -al /dev/i2c*
crw-rw---- 1 root i2c 89,  0 Jun  9 18:27 /dev/i2c-0
crw-rw---- 1 root i2c 89,  1 Jun  9 18:27 /dev/i2c-1
crw-rw---- 1 root i2c 89, 10 Jun  9 18:27 /dev/i2c-10
crw-rw---- 1 root i2c 89, 11 Jun  9 18:27 /dev/i2c-11


+

0x0C 는 누구냐... -_-?

To enable the I2C bus to the RTC you will need dtparam=i2c_vc=on set in config.txt . The RTC then will be on i2c-10 address 0x51 ( 7bit address)
To enable the I2C bus to the fan controller you will need dtparam=i2c_vc=on set in config.txt . The fan controller then will be on i2c-10 address 0x2f ( 7bit address)

[링크 : https://datasheets.raspberrypi.org/cm4io/cm4io-datasheet.pdf]

[링크 : https://datasheets.raspberrypi.org/cm4/cm4-datasheet.pdf]


+

2021.06.10

리눅스에서 해봄

libusb의 경우 이전에 RTL-SDR 한다고 설치되어 있어서 설치 안하고 된 듯.

2GB RAM / 8GB eMMC 모델인데

마운트 하려고 시도해보니 파티션도 없고 빈 eMMC 인것 같은데

도대체 라즈베리 4에서 전원 넣으면 뜨는 GUI 부트로더는 어디에 들어있는거냐?!?!

$ sudo apt install libusb-1.0-0-dev
$ git clone https://github.com/raspberrypi/usbboot
$ cd usbboot

$ sudo ./rpiboot
Waiting for BCM2835/6/7/2711...
Loading embedded: bootcode4.bin
Sending bootcode.bin
Successful read 4 bytes
Waiting for BCM2835/6/7/2711...
Loading embedded: bootcode4.bin
Second stage boot server
Loading embedded: start4.elf
File read: start4.elf
Second stage boot server done

$ lsblk
NAME   MAJ:MIN RM   SIZE RO TYPE MOUNTPOINT
sdb      8:16   1   7.3G  0 disk

$ sudo fdisk -l /dev/sdb
Disk /dev/sdb: 7.29 GiB, 7818182656 bytes, 15269888 sectors
Disk model: 0001
Units: sectors of 1 * 512 = 512 bytes
Sector size (logical/physical): 512 bytes / 512 bytes
I/O size (minimum/optimal): 512 bytes / 512 bytes

$ sudo mount /dev/sdb /mnt/
NTFS signature is missing.
Failed to mount '/dev/sdb': 부적절한 인수
The device '/dev/sdb' doesn't seem to have a valid NTFS.
Maybe the wrong device is used? Or the whole disk instead of a
partition (e.g. /dev/sda, not /dev/sda1)? Or the other way around?


+

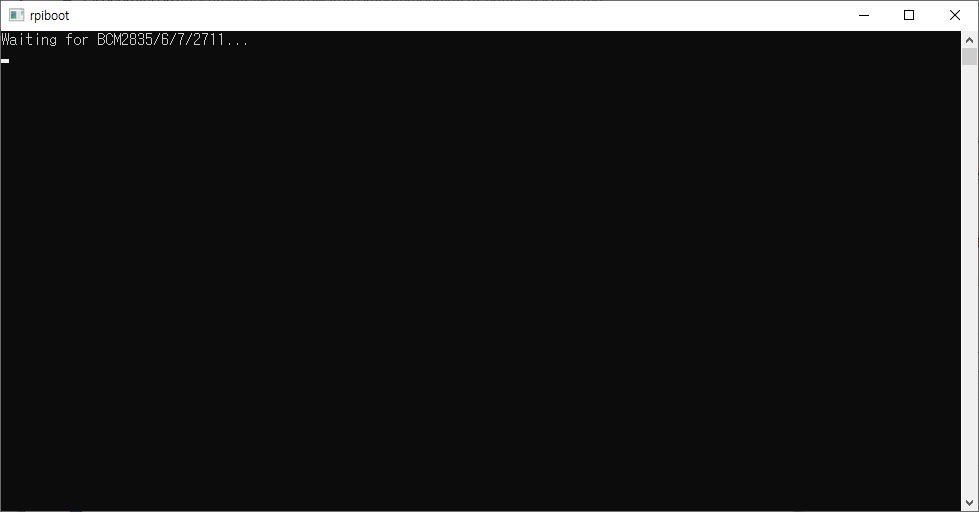
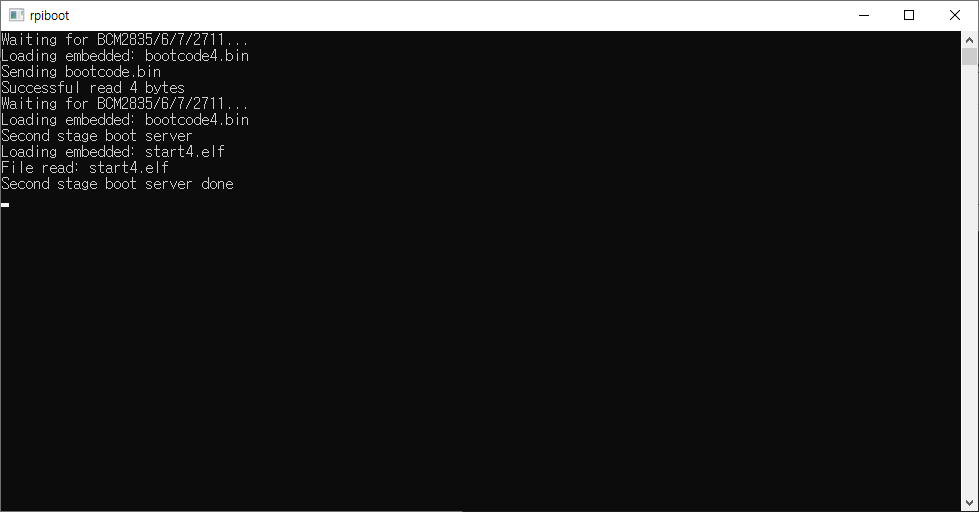
rpi4는 SPI EEPROM 512KB(4Mbit) 짜리 달려있고 거기에 bootcode.bin이 들어있다고

다만 SD에 있을 경우 내장 bootcode.bin은 무시되는 듯.

[링크 : https://www.raspberrypi.org/documentation/hardware/raspberrypi/booteeprom.md]

'embeded > raspberry pi' 카테고리의 다른 글

bmp280  (0) 2021.06.09
어?! 지름 망 ㅋㅋㅋ TEA5676  (0) 2021.06.09
라즈베리 Zero용 CSI FPCB 케이블 도착  (0) 2021.06.08
라즈베리 i2c 센서 작동 확인  (0) 2021.06.05
센서 스펙  (0) 2021.06.05
Posted by 구차니
embeded/raspberry pi2021. 6. 8. 18:30

내껀 아니지만 아무튼 도착!

라즈베리 Zero는 아니고 CM4용 보드에 한번 달아보려는데.. 잘 되겠지? ㅠㅠ


근데 언제 켜보나.. ㅠㅠ


흰 케이블이 원래 라즈베리 카메라에 딸려오는 FFC 케이블

갈색이 라즈베리 Zero용으로 구매한 FPCB 케이블(FPCB니 케이블이라고 하긴 그런가?)

'embeded > raspberry pi' 카테고리의 다른 글

어?! 지름 망 ㅋㅋㅋ TEA5676  (0) 2021.06.09
cm4 io board / rpiboot  (2) 2021.06.09
라즈베리 i2c 센서 작동 확인  (0) 2021.06.05
센서 스펙  (0) 2021.06.05
pinout  (0) 2021.06.05
Posted by 구차니
Linux2021. 6. 8. 14:40

기본은 4 레벨 7레벨까지 존재.


$ cat /proc/sys/kernel/printk
$ echo 4 > /proc/sys/kernel/printk

[링크 : https://linuxconfig.org/introduction-to-the-linux-kernel-log-levels]

[링크 : https://blog.naver.com/daetery/220986021601]

'Linux' 카테고리의 다른 글

쉘스크립트 반복 실행(인자로 준 횟수 만큼)  (0) 2021.06.11
jobs fg bg (busybox sh)  (0) 2021.06.11
dm cache  (0) 2021.04.24
watch 복수개 명령어 실행하기  (0) 2021.03.08
원격실행된 python/opencv 키 입력  (0) 2021.02.26
Posted by 구차니

비싸지 않다면 비싸지 않은데 묘하게 지르기 힘드네..

근데 재고가 정말 있긴 한게 맞으려나?

'개소리 왈왈 > 직딩의 비애' 카테고리의 다른 글

당근 무료나눔 받아옴  (0) 2021.07.20
7월 시작과 지름  (0) 2021.07.01
월 초 = 지름  (2) 2021.06.01
월 말  (2) 2021.05.31
개발자 급여는 하늘을 찌르는것 처럼 보이는데..  (3) 2021.05.24
Posted by 구차니

어우 1000까지 사탕 모았다가

하나 풀 강화하고 해방까지 해서 반은 쓴듯 ㅠㅠ

'개소리 왈왈 > 모바일 생활' 카테고리의 다른 글

v50s 액정 사설 수리 비용  (0) 2022.03.04
액정깨짐  (0) 2021.10.23
눈물의 액정수리  (0) 2021.05.15
LG v50s HDMI연결 (DeX)  (0) 2021.05.14
핸드폰 액정 꾸직 ㅠㅠ  (0) 2021.05.14
Posted by 구차니

자전거 건식 오일이 와서 바르고 나서야

발견한 남은 자전거 오일 -_-

아니 다 쓰고 아니면 이사오면서 버린거 아니었나? 너무 고이 모셔두는 바람에

있는것 자체를 까먹다니 ㅠㅠ

'개소리 왈왈 > 자전거' 카테고리의 다른 글

이런.. 자전거대행진 신청 실패  (0) 2021.11.09
라이트 청소  (0) 2021.10.26
자전거 라이트 + 배터리 도착!  (0) 2021.05.06
안녕 엔도몬도  (0) 2020.12.31
endomondo 잘가  (1) 2020.12.11
Posted by 구차니